Showing posts with label Junk Journals; Etsy; scrap; ephemera; mini album; mini book; projects;. Show all posts

Friday, 22 August 2014

Filling a Junk Journal: My 'Summertime 2014' album *Part 5*. Ways to store ephemera in your album

 
Hello you.
 
Thank you for all the positive words you've been leaving regarding these Summertime Junk Journal posts. The fact that several of you have said you've felt inspired to make your own has been music to my ears ... after all that's why I share the ideas in the first place!  [Well, that, and the fact I like to offer up inspiration as well as promoting products; it's a necessary balance I think!].
 
So, if you want to view, catch-up with or reconnect with any of the posts so far then they're all here:
  • Part 1: An introduction to the project focusing on the kinds of pages you might find to use
  • Part 2: A quick tutorial showing how to add a decorative edge to make it easier to bind thinner pages
  • Part 3: A simple method of adding a greeting card to a journal bound with book rings
  • Part 4: Demonstrating how a Junk Journal can act as a regular photo-scrapbook too.
  • Plus there's a full step-by-step tutorial here all about how to add a spine feature to a junk journal / mini-album as I did to mine.

  • Now for today's dip into the journal we're going to be looking into ...

    Ways to store ephemera, bits, bobs and thingymajigs inside your journal:

    To coincide with today's focus on papery storage options I've launched a new range of kits ... and if you're a show-tunes fan [aw, come on now, show tunes rule!] then you might be able to guess the name I've given them when I say: "Large amounts don't grow on trees ..." got it??

    "... you've got a pack-of-pockets or twoooooo":
    Pack-of-Pockets available in my Etsy shop

    
    Got it now? [OK, I accept, you might not want it ...]. But yes, I did name them a 'Pack-of-Pockets' partly because:
    Now let's look at the kinds of things you might want to do with a pocket. 
     
    Or two.

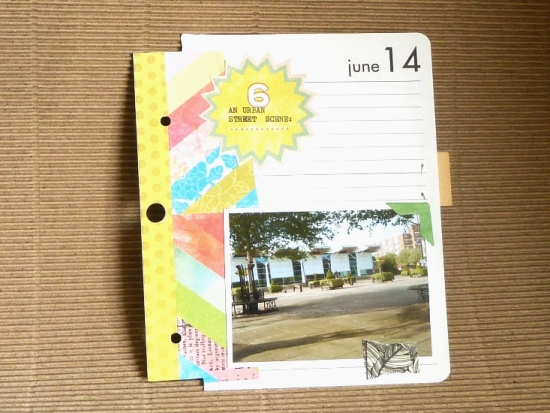
    Hide your journaling:
    Here I've typed out the itinerary from our holiday complete with the number of steps we racked-up on the pedometer. Which, as rip-roaring reads go, is not exactly a page turner!
    But, it is a useful guide to help me remember the things we did, so it was worth noting. It's just not necessary to have it on display, so I folded it up and popped it into a pocket I made from a vintage book page folded upwards and the edges taped/stapled closed. 
     
    It's also a useful technique if you want to write out something more personal where storing it in a pocket / envelope etc allows you to keep it alongside the other memories / photos but keeps it on restricted view!
     
    Also, being able to store larger pieces of writing in this way is also useful if you've been used to scrapbooking on a larger scale [eg. 12x12]. You can still document all those memories of the moment ... then just fold them and tuck them away.
     
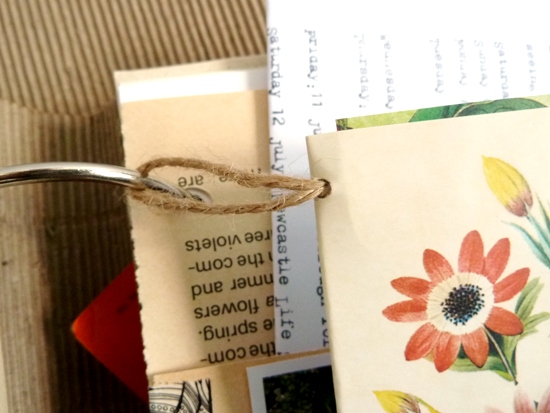
    Storing ephemera [receipts, leaflets, tickets etc]in pockets & envelopes: 
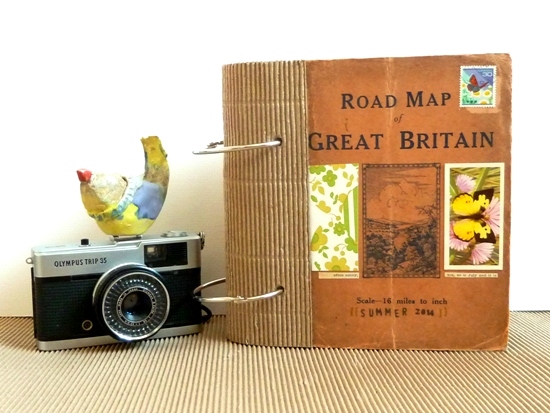
    This summer I took part in the 'Pile of Postcards Exchange' hosted by Sian of From High in the Sky and, after receiving my postcards form participants form across the globe I stored them all in a pocket in the back of my journal which I made from a vintage map
    Similarly I've been using envelopes to house the papery 'extras' that have come along with the events and experiences I've had this summer. Such as the leaflet from the huge antiques centre we visited and the scone recipe from the windmill:
     
    ... and the business cards and leaflets from the Women and the Great War presentation:
    Note the giant paperclip above - great for sliding onto a full envelope to keep everything from tipping out when you move the journal!

    These photos here show another set of leaflets being stored in a regular brown envelope:
    But here you can see how, before filling it, I glued a sheet of patterned paper inside the flap to stiffen it and keep it permanently open:
    It's just a fun way to make a larger pouch and add some colour.

    Using ephemera to store ephemera! 
    As well as envelopes and handmade pockets I've also been storing my ephemera inside some of the paper bags I received when buying something this summer; making them also the ephemera of the season too!

    This spotty one I used as a base page, for a photo and journaling block, then I tucked the booklet - relating to the event in the photo - inside the bag behind it:
    And here's another paper bag, which was the packaging to some little bird earrings James bought me on holiday, which I've bound into the journal using the strengthening technique I talk about in this post.
    And finally ... I made a bag of my own  ...
    ... using the deli-paper wrap from a block of [nearly] personalised cheese I picked up on holiday from The Cheese Society shop!
    I want to tell you that yes, of course I washed it first, but ...

    ... I can't honestly remember if I did!! Well, at least it will add a true flavour of the holiday to the journal!

    ------------------------------------------

    So, I hope those examples have whetted your appetite for using pockets in your journal.

    Or for Lancashire cheese. Whichever.

    But if it's pockets you want to see more of then there's
    Thanks for pausing to read here today.

    Julie :-)

    Wednesday, 20 August 2014

    Filling a Junk Journal: My 'Summertime 2014' album *Part 4*. The 'scavenger hunt' photos

      
    Ahoy there.
     
    This series is an attempt to show how YOU could use a junk journal ... by sharing how I've been using mine to document my summer. Like a relaxed scrapbook, photo album and filing system all in one. 
     
    You can catch up on the previous episodes here:
    Today let's consider how you might want to put your junk journal to use because, as well as being decorative and fun to make, they can also be a practical place to store and present your photos too.
     
    The 'Summertime Photography Scavenger Hunt' pages:
    While I've been sharing my Summertime Photography Scavenger Hunt [hosted by Rinda at Gallo Organico] photos here on my blog, I also wanted to have a printed record; one I could flip through in the depths of winter, or in years to come, to remind me of the days of summer!  
     
    
    To do this I made photo collages of the photos - 2 to a page - then printed them out on to 4x6" photo paper. This made them an ideal size for my book pages which I decided to keep quite simple.
    I didn't need a lot of journaling on these pages as the category titles already have it covered and each photo has its own sticker label:
    I typed out all 21 labels at the start of the project so they'd be quick and easy to add as and when I found the image to match without me having to get the typewriter out for it. [And, as you'll know from this post, my typewriter isn't the most portable of devices!]
    The majority of my Scavenger Hunt photos share the same page layout of:
    • photo
    • category title 
    • scrap of patterned paper
    • date stamp
    Plus I did throw in the occasional [ancient] photo corner under the notion I might be reviving an old trend ...
    ... but I equally forgot to do that more times than I remembered ... so maybe the trend needs a bit more help before it's fully resurrected! [I guess I can go back and add them in any time!]
    And I haven't done anything as restrictive as add them to the journal in number order or by precise date taken. After all this isn't a historical document that researchers will rely upon for chronology!

    It's just a nice, expressive, book which is gradually being filled with photos of weird hats, garden gnomes and bears etc ...
    ... so I simply allowed the journal's relaxed 'junk' style to filter through into my approach to completing it; there was just no need to add any pressures or 'rules' which could possibly deter me from enjoying documenting my summer however and whenever I felt like it!

    ---------------------------------------------
    
    If you've missed any of the other ideas my journal has spurred me to share with you, make sure to scroll back up [or hit the 'Home' button] to return to the opening of my post where I've linked to the earlier instalments.
    There's one further approach/technique I plan to share from this project ... so I'll be back with that soon.

    See you then.

    Julie :-) 

    Monday, 18 August 2014

    Filling a Junk Journal: My 'Summertime 2014' album *Part 3*. How to add in a greetings card page


    Hello again.

    Welcome to the third post in a series which aims to get you crafting with all kinds of junk, bits, bobs, and pieces by sharing my current summer journal. [Catch up with Part 1 and Part 2 here].

    I like to add in a few pages-with-a-difference to my journals - and to the Junk Journal packs in the shop - as they add a nice jumbly feel to a project. And I'm all for the eclectic!

    And one simple way to achieve this eclectic effect is by using a greeting card as an  interactive open-me-up type page.
     Whether it's a card someone's sent to you, with a message you'd like to keep, or if it's a blank card you're simply planning to use as a means to add colour and interest to your book, then here's one way you can add it into your journal ...

    What you'll need:
    • a greeting card OR any piece of card folded over
    • a hole punch
    • a length of string / twine
    What to do:
    Like my previous page binding technique, this one's pretty self-explanatory ... but just in case ...
    • Punch two holes in the fold of the greeting card;
    • Thread a loop of twine through from the inside out:
    • On the inside of the card tie a knot in the twine large enough that it can't slip through the hole:
    • Then thread the loops on to your album's book rings. Done!
    I decorated my blank card with journaling blocks and there's a photo inside too, but that's entirely optional.

    The key idea is just the basic but fun method of adding an open-out card to your journal whatever you chose to do with it once it's there!

    ------------------------------------------------------

    I do hope these posts have tempted you try your hand at junk journaling / relaxed scrapbooking. You can always get in touch to let me know when you've tried an idea for yourself, and if you're not there yet, then do pin/save this post for a future project!

    I've got a couple more posts in this series planned which I'll bring you very soon. Until then ...

    Julie :-)

    Friday, 15 August 2014

    Filling a Junk Journal. My 'Summertime 2014' album *Part 2*: strengthening a page for binding


    Hello again.

    This summer I'm sharing the pages from my current junk journal to demonstrate one way of making a record of your days from paper, card, scraps and bits!

    [If you've purchased a Junk Journal Bits pack, or a kit, or any of my Plundered Pages packs ... all the ideas can be applied to those.]

    All the posts -so far- which feature this particular journal can be found here:
    Today we'll continue to look at ways to get that journal filled up .... in creative and thrifty ways!

    How To: add a decorative edge to strengthen ephemera pages

    From time to time you'll find a sheet of paper or scrap of ephemera that you'd like to use as a page in your book and yet ... it might also feel a little too thin to hold up to having holes punched into it and being flipped over on the book rings all the time.

    You could strengthen it by backing it with card/ another sheet of paper .... but if there's something interesting on both sides then you won't want to hide one of them!

    So, next time you're faced with that dilemma ... or even if you're just looking for a fun way to bind any sheet of paper OR even just make a sheet larger ... this is for you ....

    What you'll need:
    • a page / piece of ephemera / paper bag / scrap that you plan to use as a page or feature in your album
    • two strips of paper in a heavier, more sturdy, weight
    • a glue stick
    • a hole punch
    What to do:
    Erm ... I'd hate for this to sound patronising but this is so simple I might not be able to avoid it .... let's see ...

    You simply:
    • Cut 2 strips of heavier paper approximately the same height as your thinner page. I used patterned scrapbooking paper.
    • Glue one of them to the front of your page and the other to the back sandwiching the flimsy ephemera in between the sturdier strips.
    • To make the page larger extend the paper strips beyond the edge of the existing page [my page was torn from an unused diary].
    • Next punch holes in the strips and slide on to the book ring binding inside your journal.
    • Finally, feel self-satisfied for a while ... then add a photo, journaling, collage, or nothing to your page depending on what it was for.
    Here are a few more examples of where I've used this technique in my summer journal. This one, like the one above, made use of the two-for-one patterns provided by that little decorative patterned strip you get on a full sheet of scrapbooking paper:
    And another page ripped from a diary:
    And finally, I wanted to use a paper bag which came from a shop we visited on holiday [where James treated me to a pair of bird earrings]. The bag was hand-stamped with a bird image so it seemed appropriate to hang on to it.

    I've used it in the journal as a pocket to hold additional ephemera from the holiday and, as it was a flimsy textured paper, I strengthened the edge with the same patterned paper technique:
    And that's all there is to it. Strips of paper, glue stick, hole punch .... and the world of ephemera's your crafty-oyster!

    ---------------------------------------------

    Do let me know if you give the technique a try.
    Next time in this series I'll share another easy-yet-creative, unexpected, method you can use to add a non-standard page into your journal.

    See you soon.

    Julie

    p.s: any pinning, sharing, or shouting about this idea would be very much appreciated!

    Thursday, 10 April 2014

    Junk Journals: inspiration for what to do with your 'bits'!


    Hello. How's things today?

    Me? Not too bad thanks. Just changed out of my jeans and into my 'lounge pants' ... not to 'lounge ... but to blog in comfort. [Which, alongside 'always having a parking space for the car' is one of the great pleasures of working from home!]

    And speaking of work ... earlier in the month I launched a new range of creativity packs which - as they contain 'bits' you can use to make junk journals - I've inventively named 'Junk Journal Bits' ...

    If you've already bought one [hello again + thanks!] you can scroll down for some inspiration for the kind of books you can make with your chosen bits!

    But if you've not seen them yet then here's a rainbow selection of those currently available:
    To me a 'junk journal' is a great place to stop worrying about being neat, tidy or perfect in your creative time and instead just enjoy the jumbly randomness of it all! They're an antidote for anxious, perfection-seeking, creativity.

    Each of the packs I've put together contain 20+ items of ephemera, oddments, pages, tags, labels and more from my collection of ... well ... everything! Plus something a bit sturdier you could use as a cover.

    They're available in:
    •  Large [which will probably make a journal A5-ish in size depending upon how you chop up the bits]
    • and Small [which is perfectly pocket-sized - roughly postcard-ish or smaller].  
    Here's a peek inside a few:
    If you like the look of any of that then do drop into my Etsy shop, take your pick, and I'll get it into the post to you in 1-3 working days! Because I'm pretty efficient like that!
     
    But if you'd prefer someone else's - less biased - opinion on the quality of my service ... may I point you toward the positive feedback left for me by happy customers.  It never ceases to delight me when someone finds time to leave a couple of words about their order so that potential customers feel they can trust me! (If you've ever left a review on your order .. thank you SO much!x)
     
    Anyway ... whether you havehaven't,will never or maybe might buy one of the Junk Journal packs ...
     
    ... here's some Junk Journal inspiration ...
    
     
    Below you'll find some images and links to previous projects of mine all of which show the kinds of small books you could make with the type of supplies you'll find in the kits.

    **Please note: these books are different sizes and hold different contents to those on sale in my shop ... but they are indicative of the STYLE of project you could make.
     
    • This mini book was made from 30 postcard sized pages - some [as in some of the Junk Journal packs] were actual original vintage postcards.
    • Meanwhile its covers were made from some interesting cardboard from an shoe box [and again, some of the Junk Journal packs also contain printed shoe-box cardboard just perfect for covers!]
    And if you're wondering what you could do inside the book once you've made the base ... how about some collage and journaling? 
    For further inspiration:

    (2.)Travel Journal :
    This journal features lots of ideas for using pockets, bags, tags and labels .. like those you'll find amid the Junk Journals:

    For further inspiration:
    And finally ...
     
    A quotations book : from waaaaaay back ... [one of my first ever blog posts in 2009 in fact!]: 
     
    
    Again, lots of pockets, envelopes, ephemera - like the Junk Journals Bits. Then I simply added handwritten motivational quotations on top of each page.
     
    For further inspiration: 
    Plus ...  the cover on that final book is made partly from an egg box I took a particular liking to!
     
    Well, they ain't called 'junk' journals for nothing!
     
    ----------------------------------------------------
    If you have one of the kits, and you make something with it - link me up so I can share your inspiration too.  
     
    I hope you found something here today to inspire you to give junk journals a go - whether that's with one of my kits ... or not.
     
    Julie :-)