Wednesday, 13 August 2014

Filling a Junk Journal: Inside my 'Summertime 2014' album *Part 1*


Hi you.

This year my junk journals are like buses; you wait forever for one and then you become so desperate to get home that you blindly get on the next one that comes which turns out to be the wrong one and then you have to get off and walk in the rain. No, hang on ... I'm confusing junk journals with my life ...  ;-)

...no, what I meant was: you wait forever for one and then two come along at once. Yes, that's what I meant.

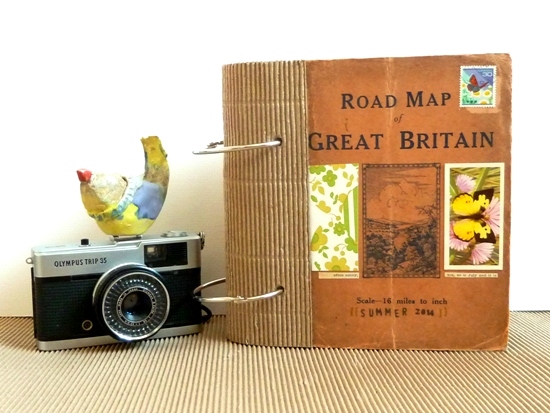
My 'Summertime 2014' journal ...
... is the second I've shared here recently after sharing my 'May 2014' one in the last few weeks here, here and here.

Plus there's a full step-by-step tutorial here all about how to add a spine feature to a junk journal / mini-album as I did to today's journal.

 And I'm sharing them with you this summer for two main reasons:
  1. I like how they turned out. Woo! Yay! It's always nice when a project goes to plan!
  2. And ... I get asked by customers and people interested in the junk journal 'bits' in my shop [all one-of-kind packs, filled with genuine ephemera and oddments!] if I can show them any examples of the kind of things they could make with their packs. [They do ask that!! I swear!]
And it can be tricky to offer up simple examples as each pack I sell  is different ... so I can't show a pre-prepared sample ... or else I'll have used up the kit and it'll be gone!

But I can at least use my books to demonstrate a few possibilities and general approaches you can take with the 'bits' packs you've bought from me[or your own ephemera].

So, if you've ever asked ... and even if you haven't ... here's what you too could do with a small pile of paper, a hole punch, two book rings and something sticky. [Like glue or tape I mean. Not honey. Or a stick.]

My starting point:
I created this 'Junk Journal Bits' pack for myself which - like many I sell - contained a mix of 20 or so colour-coordinated items of ephemera:
For some reason I was inspired to use a colour scheme I don't think I've used before: green, yellow and peachy orange and [fortunately!] it seems to have turned out OK in the end!

BTW: My golden rule whenever I'm trying to get a colour scheme to work is: be brave and just keep adding. A few items in a weird colour mix will stand out and look odd. But, thrown in a lot of odd colours, several times across the project, [a yellow page here, a yellow label there, a strip of yellow washi somewhere else] and you've got yourself a deliberate colour-scheme!

The basic assembly of my original 20 pieces involved nothing more taxing than punching holes along the sides of the items I planned to use as pages and at this point it looked a bit naked ...
The cover:
To house my journal I followed the techniques I've detailed in this tutorial, to create a book-style cover ... leaving it better dressed than before! [See above] To personalise the cover I added a vintage collector's card and old postage stamp featuring butterflies, a strip of vintage wallpaper and a few word snippets on a summer theme.

The pages:
 As it's intended to be a document of my summer it contains:
  • photos of my July city break;
  • plus pockets of ephemera [tickets, leaflets, receipts] from the holiday;
  • notes about what we ate ... we're foodies; eating out is one of the highlights of any trip and definitely needs documenting!
  • plus it was the obvious place to house the photos I've been taking throughout summer for the 'Summertime Photography Scavenger Hunt'.
To store all of this I used a mix of page bases and you really can use anything you fancy to fill a junk journal [the clue's in the name!]. 

Here's a page from an old book which I've done nothing more to than add a few scraps in the bottom corner. When you've got a fabulous illustration like that there's no need to cover it up! Just allow it to add a unique feel to your journal:
I even used the back cover from of the old map that I used on my front cover and, rather than trim it down and cover over the holes in it, I simply kept it whole, punched holes for the book rings and stuck a photo on top: 
Another page was made from an old mileage claim form [from my ephemera collection] which happened to fit my colour scheme and subject matter perfectly!
Then there are lots of pages made simply by chopping up sheets of patterned paper:
And they really are all chopped up. Not carefully measured and trimmed. Chopped / hacked at with scissors. 

In fact, the whole book is a particularly higgledy-piggeldy, randomly eclectic project; no two pages are the same size ... it's quick and wonky and that suits me just fine!


As much as I love playing with paper I really want a book about my summer to be completed in my summer! There's no hanging around for perfection here! 

And, when the end result is a fun patchwork of colour, shape and moments ... then the lack of straight lines or carefully measured edges really doesn't make any difference!!

-----------------------------

This glimpse into the basic make up of my summer junk journal is just Part 1.  

There are several more to come in the days ahead all aimed at offering up general ideas which YOU can adapt into your own book. I'll be covering:
  • a variety of ways to store ephemera, leaflets, tickets etc
  • plus a few creative techniques you can use to add in some more unusual page styles
  • all with examples on how I've used the methods in my journal.

If you're inspired by any of the ideas from today then please do pin / share them with like-minded crafty-types. Your support really does help my blog and shop reach new sets of eyes and it's always very much appreciated! 

Right ... I'll be back soon with those further ideas on how you can fill a junk journal. See you then then!

Julie

Monday, 11 August 2014

Overheard: An off-the-cuff remark


Hi, hi.

It's been too long since I shared some everyday conversational gold sifted from the general hubbub of life so here's the most recent nugget I've overheard. Except the thing with this one is that it wasn't so much overheard -  as it was said directly to me and my friend ... here's how it went ...

Date: Friday 8th August 2014
Location: A gift shop, Ripon.

My friend Janet had been looking at gifts for her son which featured deer / stags on them and, in this particular gift shop, I spotted a pair of stag's head cuff links which I thought she should see. So I  called her over and she picked them up.

At that moment the young assistant moved in and, assuming it was the cuff links rather than the stag design we were interested in, she directed us over to a larger display with the words:

"We've got more cuff links over there'. Except ... that's not quite right. 

That is not what she said to us.

It's undoubtedly what she meant to say.

It's what Janet thought the girl had said as she followed her over to browse the display.

And part of me really hopes it's what the girl herself thought she said ... because, as long as she can keep assuring herself that that is what she said to two potential customers browsing for an innocent gift for a son, then she'll be spared the embarrassment. The mortification felt by the young.

Because ... as she swept her arm in the direction of the larger display of gentleman's accessories ... what she actually said to us was ...

"We've got more hand cuffs over there'.

And no ... she wasn't directing Janet to some early merchandising for the 50 Shades of Grey movie ... it was actually just a joyfully magnificent Freudian slip! 

I think it was the knowledge that, by witnessing it, I had my next blog post all wrapped up that kept me from spluttering out loud right then and there!

Will you join me for a moment to share in my hope that it never dawns on her what she said? Either that or we all start making donations to her future therapy fund ...

----------------------------------------

Wishing you an embarrassment-free week ahead.

Live long and eavesdrop my friends!

Julie ;-)

Wednesday, 6 August 2014

Zoom In Zoom Out: A fully fledged surprise


Hi there.

Whenever I've joined in with Zoom In ¦ Zoom Out [a photography/storytelling meme created by Helena] in the past I've always done as the title suggested; zoomed right in on the focal point of the story, then zoomed out to explain the wider context. But today I'm swapping that around ...

Zooming Out ... 
Yesterday I needed to use the printer so came downstairs from my workroom, turned it on and, while waiting for it to leap into life I looked out of the window into the garden. So far, so mundane. I know.

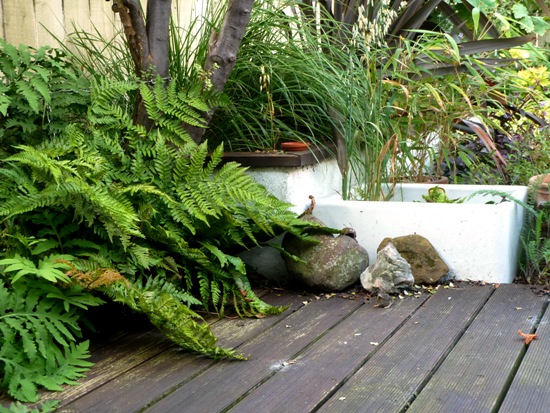
But at that very moment, completely at the whim of serendipity this just happened to be what was waiting for me on our decking:
No, I don't mean the stones, or the patchy wood stain, or the ferns ... they're always there. I mean the little thing. On the floor. Can you make it out?

No? OK then ... how about now?

Zooming In ... 
I know!!

Mostly cute, partly prehistoric-looking and entirely unexpected this freshly fledged Dunnock chick was a sight to behold!

I first realised we had a nest - which is at the bottom of our garden, wedged between the fence and a clematis and right near the hook where I clip my retractable washing line - when a bird shot out of the undergrowth every time I put the line up! Not that I knew for sure there were eggs inside ... I was always taught that you don't touch nests ... so I didn't!

Then, one day, about a fortnight ago, when James put his hand in to clip the hook up ... three beaks emerged over the top of the nest and ever since then it's been a little like Springwatch here!

After watching, and identifying the adult birds as Dunnocks we read up about them and their habits etc including how long they take to fledge. But I never expected to see it happening!

Only the day before I took these photos this chick, and its 2 siblings, had been still happily sitting in their nest. Then suddenly - right when I needed to use the printer - there it was, on my decking!

I watched for a while as its mother hopped around nearby trying to get it to follow her around the plant pots and into safety, tempting it with the food in her beak and her repeated tweeting but then ... I continued on with my day. And so did they.

And now ... they've all gone; flown the nest.

But at least I got a farewell photo!

--------------------------------------------

To read more ZIZO photo stories visit Helena's Creative Maven today.

See you soon.

Julie :-)

Tuesday, 5 August 2014

Summertime Photography Scavenger Hunt 2014: The Juggler


Hello you.

Today's scavenger hunt find is one of the items I didn't expect to be able to cross of the list [the list was created by Rinda of Gallo Organico]; a juggler.

It's just not someone you bump into everyday is it? [Not that you should be bumping into jugglers at the best of times; it could cause them drop their balls ...]

I suppose I thought I'd find one alongside wherever I found another of the items on the list: A Parade. But no - my parade featured Air Cadets marching around in uniform ... and there weren't many circus-skills in evidence there!

So, imagine my optimism when, while mooching around The National Centre for Craft & Design  in Sleaford, I spotted this promisingly-titled exhibition:
And, after a scan around the display my eyes happily alighted on this ... a juggler! 
It's a soft sculpture made of padded fabric body parts ...
... and ... just in case you're sitting there saying 'How does she know that's meant to be a juggler? She's probably just making it up so she can cross it off her list.' then ... ahem  ... allow me to clarify ...
Which means that I'm now just a sunrise, a public garden and a tattoo short of a full house!

BTW: we did ask a staff member for permission to take photos of the exhibition. And you can find more of Anna Steiner's work here on her website. 
 
But if it's some slightly more amateur [although no less expressive ... ] art work you're looking for ... then look no further:
Alongside the exhibition there was a table covered with coloured papers, glue sticks and scissors and a sign inviting you to 'Make your own acrobat' to add to a shelf filled with those made by visitors/school groups; and James took them up on the offer. [Cutting up paper felt too much like a bus man's holiday for me!].

Rather than follow the instruction sheets, he went his own way, cutting out a tiny acrobat which he then carefully positioned behind the others on display:
A tiny clumsy person who can't stay upright ...  
 
... I just can't imagine who he based his design on ... ;-)

Monday, 4 August 2014

How To: add a book-style spine to a junk journal


Hello there.

If you want to pick up a simple technique that can smarten up your junk journals and mini-albums ... then this step-by-step tutorial - on adding a book-style spine - might be just the thing!
Adding a spine is not something I do to every mini album I make, but I do like the way that covering up the open edge just seems to finish off the project giving it a more 'proper' book-like feel.

For this particular journal [which I'm using to house photos and ephemera from my summer 2014]
I wanted this lovely, soft, faded old map cover to be my focal point:
  • If you're inspired by the romance and nostalgia of an old map then check out my packs of old mixed map pages here.
  • And, if it's the idea of using a pre-existing cover for your own book covers then, while it's not a map cover, there is  a set of old Maths book covers inside this Junk Journal 'Bits' pack which have a very similar colour/feel.] 
I knew that, by using the techniques I'm about to show you, I could turn that flimsy, delicate, old cover into a sturdy book which I could look at, admire and handle for years to come! But equally you could use anything at all to decorate yours.

In the tutorial I'll provide you with a handful of measurements just to give you an idea of the scale of the elements involved in my photos - but you can easily alter the sizes to suit your own preferences.

So let's make a start ...

WHAT YOU'LL NEED
  • Enough sturdy cardboard to make two book covers. This can be greyboard/chipboard, any re-purposed packaging or even simply the backs from two notepads!
  • Corrugated card
  • Strong double-sided tape [eg. ATG gun / red line tape] or glue
  • A craft knife and ruler
  • Some sort of hole-punch [preferably a long-reach one [eg. Crop-a-dile] or a hand held bookbinders' tool]
  • 2 hinged bookrings [available here if you need some]
1. Cut two rectangles of stiff card for your covers:
Mine were cut from some old packaging and measured 15x19cm:
NB: Here I'd stuck my map covers on to the card already but you can decorate yours once you've completed the process; it doesn't make any real difference. Also ...

I didn't photograph the step where you need to punch holes and so ...

IMPORTANT NOTE: If you don't have a long-reach hole punch [like a Crop-a-dile] or book binding tools, you might want to make the holes for your book ring BEFORE fully assembling the book - while a regular depth punch might still fit! Just make two holes along the edge of each cover.

2. Next you'll need some corrugated card for the spine:
This should be fairly easy to find online but if you're having any problems then ...
  • Check the kids' crafting section of art/stationary shops; seemingly corrugated card is big in crafting for the under 5s! [NB: however ...it may well not be nice neutral kraft coloured card. Lurid primaries are also big with the pre-school brigade!]
  • Try the parcel packing supply area of any stationary store. I found mine [which comes on a roll] at The Range, near the padded envelopes and parcel tape.
3. Now work out the size of your album's spine!

TOP TIP! Remember that corrugated card only curves around in one direction - make sure you cut it with the ridges facing in the right direction or you won't be able to bend the spine!
The corrugated card needs to measure:
  • the height of your journal
  • by a width which - once it's curved around, like a book spine, it will fit comfortably inside whatever book ring you plan to use.
** If you need a large book ring I sell the 3"/63mm ones I've used in this project here in my Etsy shop.

Plus ... it also depends on how thick you want to make the book!
It sounds more complicated than it actually is, once you've got the card and the book ring in your hands, you'll begin to get a feel for it. You can even test it out for size by placing a stack of papers inside - just to get an idea of the size you'll need.

However ... if you really don't know how big to make the spine [for example, if you don't know how thick your finished book will turn out]

... you can always add the corrugated card spine AT THE END OF YOUR PROJECT rather than at the start like I have here.

The principles are just the same, just make your covers punch your book ring holes and fill your book as you normally would. When you're finished remove the covers and join them together with a corrugated spine making sure to cover over the punched holes in your covers. Voila!

Once you've decided on the width of the corrugated card spine ...

4. Bridge the gap between your covers with the spine:
[This spine is approx. 12cm wide]

I ran a line of ATG tape down the edges of mine as I feel it needs a good strong adhesive to prevent it popping off! [Those curves have a natural inclination to spring back in the opposite direction!].

You might want to try ATG tape or strong red line tape or even a wet glue [but this will be a bit messier!].

TOP TIP! Whichever adhesive you use make sure to put it right up to the very edge - where the corrugated card meets the covers. This way it will help keep it flush and avoid it getting snagged and lifting up.

5. Flip over the joined covers to reveal the new spine:
At this stage - if you haven't already made holes [like I hadn't] and you have a long-reach hole punch or book binder's tools etc - you can mark out where you'd like the holes for the book ring. I punched them approximately 1cm in from the edge of the thick card of the cover.

Bend the book into a closed position to double-check you've left enough space or that you haven't gone too far in! Think of the spine as there just to hug around the edge of your pages.

6. Add another section of corrugated card to the inside of the spine to strengthen it:
Re-punch the holes , where the new layer of card will have covered them over, and finally decorate your inside covers!

7. Add in the book rings and start to fill your newly-bound book-style-spine junk journal!
So that's all there is to it; it doesn't really need to be an exact art ... but it's a nice simple way to create the artisanal feel of a hand bound book .. without the expertise!

Here are a few more examples of my spine-bound albums so you can see how the method works both in a different scale .. and using a different material too.

More inspiration!
[A] My '30 Postcards to Myself' journal:
This is a smaller scale [approx. 11x16cm] to the book in the tutorial, with just a single hole punched through and a fairly tight spine which - as I suggested above - I made once I'd added all my pages to the book, so I knew how big to make it:

 [you can read more about this project here]:
[B] A mini Christmas planner / album / tag book [approx. 8x12cm]:
This featured in my '10 Ways with Corrugated Card' feature which was published in Papercraft Inspirations magazine last year:
And finally ...
[C] A fabric alternative to corrugated card:
Using the exact same method as in the tutorial I made the spine of this travel journal from self-adhesive fabric paper. [Rather than just rely on the pre-existing adhesive I also used my strong tape along the edges just to be sure!]. Adding the strip of fabric on the inside of the spine adds a decorative touch as well as helping to reinforce the strength.

You could use regular fabric too; heavier weights like denim and canvas would work well for sturdy spines while flimsy fabrics, though not strictly structural, could still add an attractive finishing touch.

I hope you've found something here today that might spur you to go and pick up your crafting tools!

And if you have any questions or suggestions please get in touch in the comments or on my 'With Julie Kirk' Facebook page. 

If you've enjoyed this post please share it by whatever means you share things: Pinterest, Facebook, Twitter, Tumblr, hieroglyphs ... mime ...

I truly appreciate any & all support for my free tutorials!


And don't forget you can rummage through lots more junk journal supplies and vintage papers in my shop.

Julie :-)