
Hi hi.
If you were here the other day - when I posted about the progress I've made in my work room redecoration project - then you'll have heard me mention I was also decorating a little somewhere where my zebra collection could thrive too.
And here it is ... complete with directions on how you too can up-cycle a cheap/old box frame into a fancy custom display case!
[With thanks to Effie of Efemera Ink who first introduced me to this technique a few years ago.]
WHAT YOU'LL NEED
- A box style picture frame
- Sandpaper
- Paint [regular white emulsion will do]
- Paintbrush
- Thick cardboard / grey board /chipboard
- Old book pages
- PVA / white glue / gel medium etc
- White acrylic paint / gesso / Distress Stain [I don't know about you but I can never keep a straight face while referring to 'Distress Stains'. Oh my.]
- The size and depth of this will depend on what you plan to display in it afterwards. Mine's deep enough for my zebras. [A phrase you won't hear that often.]
- As you're going to paint and customise it you needn't worry about finding a 'perfect' example.
- Keep a look out for them in charity/thrift shops, car boot sales etc and remember - it doesn't matter how ugly the thing is .... you're going to cover over it all eventually. Just enjoy the bargain!
- Mine was something James spotted a skip and brought home for me years ago [it's been lurking in a cupboard ever since ... until inspiration struck last month!]
- And, for this style of 'printer-tray' style project the box doesn't even need to have glass in it ... mine didn't, and you don't need it.
- If you're going to paint your frame give it a quick sand first. There's no need to try to remove every last trace of the original colour; just sand it enough to give the paint something to grip to.
- Then paint over it using ... anything you've got handy!
- I covered over the horrible reddish fake-mahogany on mine with the same white satin paint I'd been using to refresh the woodwork in my craft room:
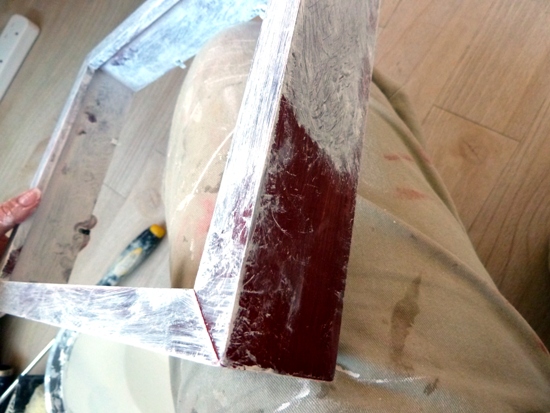
- If yours is bare untreated wood then acrylic paint would cover it easily.
- If it needs a few layers then give it a quick sand down in between coats. The end result will be worth the extra effort.
- Once the paint is completely dry sand over the frame to distress the edges and corners.
- I used quite a course grade sandpaper for this, which gives quite a scratchy texture, a finer grade will give a softer effect.
- Don't press too hard at first, just get a feel of how much paint is coming away each time. It's easier to sand over it again to take more off than it is to go back and re-paint the whole thing!

- Finally spray on some furniture polish or apply some wax and buff.
CUSTOMISING THE INTERIOR
You need some sort of base structure on to which you can build up your shelves / dividing strips. This part is all going to depend on the size and shape of your frame plus what kind of insert/backing structure it came with ... so bear with me!
- Mine came with this 4-sided grey board/chipboard type box insert already inside:

- But if yours simply has the back section [that you would normally use just as the back of the frame] then that should work almost as well. You might need to secure your shelves a tiny bit more, but it's not a major issue.
- Plus you'll need to 'wall paper' around the inside walls of your frame before adding the insert with the shelves too.
- And if you've simply salvaged an empty frame with no insert or backing at all ... just cut yourself one from a sheet of grey board, a sturdy cardboard box or even the backing board from a few A4 notepads glued together.
- How many shelves you want and how you're going to position them.
- You can also add uprights/ vertical dividers in the exact same way I'm about to show you for the shelves.
- When arranging your dividers just keep in mind the size of the items you plan to display in the frame - then base your layout on that.
- After all your hard work you'll want to make sure the precious items you want to show off will actually fit inside!!
- Cut shelves from a sturdy cardboard box [as I did here] or grey board etc to fit inside your base structure.
- Measure and mark out in pencil where you want them to sit:

- Add a slosh of water to a tub of PVA glue [How much is a slosh? I don't know! I just know you don't want to water the glue down too much ... you want just enough to make it 'glide' across the paper more easily, that's all!].
- Tear strips from the pages of an old book.
- [I used an old French botanical book - pages of which can be found inside the Modern European Language vintage pages packs available from my Etsy store. Or, if you'd like a custom order of just these papers, get in touch!]
- Apply the glue to the paper using a brush then stick the paper to one of your cardboard shelves.
- Make sure to leave at least a few centimetres over-hanging the edge:

- Now fold the overhanging section over on to itself, position the shelf where you want it, then press the excess paper down on to your base structure:

- Think of this part as adding a bracket support to a shelf!
- Repeat the process of adding paper brackets all the way along the top and bottom of each shelf you add.
- You may need to allow one coat of glue to dry before adding more layers as your cardboard and can get too damp and begin to bend, buckle and the paper starts to drag and tear.
- Keep repeating the hinging process it until each shelf begins to feel secure enough to take the weight of the treasures you'll be displaying on them!
- You also need to cover the entire backing board with scraps of torn paper overlapping one another - and overlapping the brackets of the shelves too.
- The finished result should be random - no need to be methodical of neat here!
- Just keep adding sections of paper alternating their size and direction - until the whole thing is covered.
- Paint over each layer of paper with glue as you go along to seal any loose edges.
- If your frame didn't come with a cardboard insert, remember to wallpaper the inside walls of the frame to match!
- Finally, just to 'knock-back' the finished text-print design wash over it with either watered down white/cream acrylic paint or gesso or a Distress Stain in 'Picket Fence' as I did here:

- A quick wipe around, blending out the colour with a damp paintbrush, should be enough. You don't want to cover the text print altogether.
- Leave to dry and then ...
All that's left to do is:
- Hang your frame on the wall, or stand it on a shelf then introduce your treasures to their new home.

You can see how the shelf just blends into the background [and also how terrified/hostile these 3 little ones look in their new abode]:


Two old ones I bought to give away ... and, erm, never got around to letting go ...

The one who kick-started my collection.
The one so famous he just goes by a single name: Zebra. [Hey, I didn't say it was an original name!]


But I'll leave you with the latest version once again:
------------------------------
And if you're not planning to make on right now please pin this post for future reference!
Any support for my free tutorials is most appreciated!
Julie x


It looks gorgeous Julie!
ReplyDeleteThis is very cool and perfect to display a small collection!
ReplyDeleteLooks fabulous... and a posse of Zebras should be a legal requirement I think! Jo x
ReplyDeleteI love the zebra's new home! I did a similar thing at Christmas using old frames as a canvas for a Christmas picture http://scrappingkatie.blogspot.co.uk/2013/12/christmas-cheer.html but didn't paint the frames which I will do next time :)
ReplyDeleteLet me know when the French botanicals is in the shop :) I have a book of First World War letters in French that I have been cutting up (I had two copies randomly!) and I have had some great found phrases from that.
Thanks Katie! The French pages are now in stock in the 'Vintage Paper Packs' section of my Etsy shop: https://www.etsy.com/uk/shop/JulieKirk?section_id=10628381&ref=shopsection_leftnav_3
DeleteThat's a great tutorial Julie, not only clear but beautifully illustrated. I hope the Zebra's are happy in their new home, it certainly looks good!
ReplyDeleteA really detailed tutorial and so nice to the eye! I am glad that there is some room left for any additional members of the zebra herd who find their way to you :). That' sad neat way of doing the shelves, by the way ...
ReplyDelete