Hello, hello.
If you're here, reading this, then I'd guess that either messing about with paper and glue is
currently your cup of tea ... or you'd
like it to be and have landed here looking for inspiration. Either way this list of 101* items you could use in collage / mixed media / general paper-crafting
must contain
at least one thing that sparks your imagination and gets you reaching for something new.
And it will demonstrate that:
- there are plenty of less obvious - but still inspiring - supplies and sources out there;
- that you don't always need to spend a lot of money on the latest trends;
- and that there are many creative alternatives out there just waiting to be discovered and incorporated into your next project!
*But before we begin, I'll confess that it's more like 101
-ish materials and ideas. Give or take a few ...
... so I'm hoping that you will contribute your own ideas in the ... comments then I'll add them to the list! [What? You didn't think I'd be doing
all the work did you?]
And, even though I was inspired to write the list
now as part of
my altered book and collage adventure, the ideas behind it are universal and can relate to any kind of collage/mixed media project.
So, let's begin our search for new supplies shall we?
I've divided the list into the various places in which you'll find them and you may be pleased to hear that for many of the categories, you won't even need to leave the comfort of your house/pyjamas!
Let's start by going as far as your front door and, if you
are in your pyjamas, it's probably best if you stray no further than that for now ...
(a)Supplies you might find in your hallway:
1. Junk mail: OK, yes, it is annoying when you see all the mail on the mat, begin to feel important and loved, and then realise it's actually all take-away menus and offers to quote you to cut down trees you don't have. But, before you drop it into the recycling bin, scan your eye over it for any interesting images, colours, textures or phrases you could snip out and keep. Think of it as a free collage-supply delivery service.
2.
Security envelopes: One of the few pleasures of opening official-looking mail is in finding a new print inside the envelope! I
know it's not just me! Here's
an art journal page I made featuring a security envelope:
... and also
a scrapbook page - one of many
postal themed projects in my Going Postal series. Similarly ...
3. Wording / phrases from envelopes: such as the 'Printed Matter' snippet on this page:
Other fun slogans that can come in useful on journal pages include: 'Fragile' and 'Do Not Bend'!
4. Postage stamps: there's always something vaguely romantic and nostalgic about those perfectly petite and colourful rectangles that drop on to your door mat. If you don't receive much stamped mail then seek out a vintage pack. [Again
Going Postal featured
lots of projects using stamps such as this scrapbook page.]
5. Magazines: Once you've read them ... take the scissors to them!
Is your coat and bag hanging up in the hall? Then go and check them for:
6. Train tickets
7. Car parking tickets
8. Bus tickets
9. Receipts
Not only can these make interesting backdrops in their own right - because of the specific details they contain - date / location/ what you bought etc - they're great for using on pages that document a particular event / moment in time. Here's
an art journal page of mine where I used a bus ticket and receipt.
10. Paper bags from your purchases: when you come home and dump your shopping in the hall ... take a look at the paper bags before throwing them away. I keep pretty much
all of mine - and while the small ones make useful pockets for junk journals [
like in my summertime Junk Journal] the full size bags make perfect full-size journals/scrapbooks in their own right. [If you took the Christmas craft class
'12 Days' which I hosted with
Kirsty Neale a few years back there's a full tutorial on how to make one - dig out your class notes!]
11. Price tags / hang tags: while you're there, sorting through your purchases so you can keep the bag ... remember to save those hang-tags too. Some of those are a work of art in themselves and make fun additions to pages. [
I made a whole mini book from hang-tags too].
12. Packing paper: I don't know what it is about brown paper packages that I find so attractive[let's blame Julie Andrews shall we?] ... and part of me can't bear to throw it away. When a parcel was delivered to me containing lots of paper as wadding inside, I kept it and made a journal with it!
Check out the instructions here.
13: Cardboard boxes: Ah,
where would my junk journals be without a good old cardboard box?!
Cardboard covers can easily be decorated and disguised entirely ... unless you like cardboard / packing materials so much you want to keep some of it on display [yes, of course, I fall into the
latter category!]
OK, with all your supply-hunting, you've probably worked up a thirst by now so let's grab a cuppa ...
(b)Supplies you might find in your kitchen:
14. Tea bags: yes, the actual tea bag ... not the paper bag it comes in -
Anna Dabrowska / Finnabair created this lovely page from tea bags!
15. Individual tea bag packets: some of these have pretty designs / prints - in fact a whole craft technique emerged form them [tea-bag folding!!] but you can equally use the prints in scrappy style collage.
16. Tea bag labels: I used one of these in the background to this messy journal page a while ago.
17.Coffee filters: they're papery and textured ... so they're fair game for painting/inking on!
18. Deli paper: this can be tricky to get hold of in the UK but it's nice stuff to paint on / use with a gelli-plate if you can get hold of it.
19. Kitchen roll: yes, the stuff you mop up spills with. But if your spills are pretty, inky, ones then
try my step-by-step 'faux alcohol inks' tutorial with them!
20. Patterned napkins: pretty, affordable [especially if you just 'save' one from the lunch table you find yourself at ...] and, when you separate the layers they're very easy to glue to any surface [like a canvas].
Here my friend Kirsty Neale shows, step-by-step, how you can up-cycle a stool using napkins!
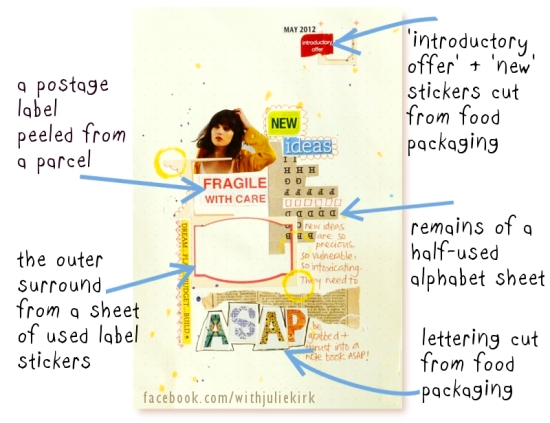
21. Food packaging: It's always worth casting a creative eye over the boxes and packets in your food cupboards ... you just never know when a font, graphic or print will leap out at you. Here's a
breakdown of a journal page I blogged during my 'Rubbish Week' series - featuring food packaging:
22. Egg boxes: Yes, I have used
an egg box as a junk journal cover. What? I
was a
nice one...
23. Recipe cards: I bought a pack of these. I hardly
ever refer to a recipe. Therefore ...
they became collage fodder!!
(c)Supplies you might find in your office:
24. Lined paper: Boring? Only if you don't love stationary!! [Who doesn't love stationary]. I like to use it as a base for journaling with my typewriter.
25. Graph paper: What can I say? I took CDT [Craft, Design & Technology] for my GCSEs ... and there was a lot of tech-drawing involved .. maybe this is where my love of it came from. But all in all, graph paper does have a charm of its own - maybe a geeky one - and it looks great in collage.
The same goes for any old lined / gridded etc school books you might have in the loft, or ones you find in junk shops/car boot sales. Slightly
aged paper is my favourite to work with. [I'm a sucker for authenticity!].
26. Sticky notes / Post-its: If you need a splash of neon [and, let's face it,
everyone needs a splash of neon sometime], them reach for a sticky-note. Sorted!
27. Desk pad: Y'know, those pads of paper you can doodle on etc while you're working / browsing Pinterest? Occasionally I find I've doodled / written something particularly nice / interesting ... and I tear it off for future use!
28. Index cards: I use these a lot in my junk journals, again, they're great for typing/stamping on to.
29. Postcards: new blank ones are just as useful as index cards for making quick journal pages.
30. Diary pages: any unused pages in old diaries fit into the same category as lined peper etc: all good collage / journaling materials. It's a reason to hang on to all those promotional ones / freebies on the front of magazines that you get inundated with at Christmas and New Year.
31. Laminator sheets: I once made fashion accessories by heat-laminating patterned papers ... so I see no reason why
you shouldn't!
32. Print outs: I also
once used a water-stained computer print out as the base for a journal page:
Well ... printer ink is so expensive, you might as well set it to work for you! Same goes for ...
33. Bad photo prints: Again, ink is so expensive ... plus I like a challenge. Why not re-use any imperfect prints you've made? Visit
my full tutorial here:
34. Wrapping paper: ... is not just for Christmas /birthdays, it's for playing with all year round. so many colours and prints you'd be a crazy print-neglecting fool not to save some scraps for your collage/journal pages.
(d)Supplies you might find in your craft room/cupboard:
If you're a more traditional card maker or scrapbooker and have been joining in with
my altered book and collage adventure, or if you've always wanted to try something a little messier, more freestyle, more collagey/art-journally/ mixed-media-ish then you might be put off by thinking that trying a new style would automatically mean a whole new set of supplies.
Well ... I'm happy to say there's absolutely no need whatsoever! It's like when Dorothy discovers in the Wizard of Oz that she had everything she needed all along! And. to paraphrase
Bananarama [who'd have thought that would be a phrase you'd find yourself reading today?]
'It aint what you use it's the way that you use it' as so many seemingly traditional crafty supplies can be transformed when incorporated into collage etc. Here are a few ideas ...
35. Patterned papers you've had for years / papers you no longer love: Maybe these will look better snipped into small strips and used in abstract collage? If not have a session where you lay them all out and paint over them / knock-back their colours with gesso. They can then become backgrounds or snippets.
36. Origami papers: some of these have really pretty designs so are worth snipping and experimenting with even if you never plan to fold them!
37. Tissue paper: Perfect for covering canvases or for layering up under painted layers to create texture.
38. Crepe paper: Again ... nice base textures - also nice to die-cut.
39. Handmade papers: More texture! Lovely to paint on too and they absorb inks nicely too. Similarly ...
40. Watercolour paper: If you've dabbled in painting then you might have a pad of this laying around. It's great for using with inks [as well as paint] and, the beauty of my favoured style of collage [where I chop papers up fairly small] is that, I can experiment with inky /painty techniques on the paper then snip it up and use it in an abstract design purely for its interesting colour / pattern etc.[The image at No.41 features some pale inked designs on watercolour paper].
41. Corrugated card: I think this one extends on from my love of packaging supplies and
textures. Snip, staple, enjoy!
42. Vellum or parchment: Call me the Emperor's new collage artist but I enjoyed adding a
translucent layer to some of my recent pages [you can just make out where I stapled it]:
Plus, the more grainy parchment paper was nice to type on - as I did here [above] with my journaling.
43. Acetate: OK, yes, this is even more see-through than vellum but it can be used for more than shaker cards! Paint on it/ alcohol ink it / Promarker it. Chop it up, punch holes in it, stitch through it ... combine it with
No.19 'Kitchen Roll' to
make faux alcohol ink effects
!
And while we're on the topic of translucent materials ...
44. Mica tiles: Like me, you might have some of these languishing in the back of your cupboard! For a long time I wondered what on earth I was meant to do with these so, as with most things in life, I added paper to them and felt better immediately!
Here's one of my experiments.
45. Washi tape: Use it to add quick colour to a collage / page, use it to make a collage in its own right. Use it as a 'hinge' to add extra layers / flaps. Edge your pages with colour and print just l
ike I did in my altered book:
And even
make patchwork embellishments with your off cuts!
46. Alphabet sticker sheets:
when you realise you're
never going to use up every letter in a full sheet of alpha stickers simply chop up the entire sheet and use it or its surrounds as a page in a junk journal
47. Sticker sheet surrounds: The same principle applies. I tend to use stickers and labels etc on my more traditional projects, such as my magazine work, then keep the surrounds to add interest to slightly edgier / more relaxed projects. I simply peel off the outer surrounds and use them as a layer on my page.
48. Die-cut outers: Like with the surrounds of the sticker sheets I like to use the outer shape left behind when I've been die-cutting. I think I take a perverse satisfaction from using the bit I'm not 'officially' mean to. [In the history of great rebellions this one is, I grant you, somewhat minor ...].
49. Punched shapes: OK so yes .. sometimes I even use the shape
as it comes, direct from the punch! My point is ... just because you might use your dies and punches in your card making etc ... don't think they won't work in a more relaxed / arty / edgy style. They do! If in doubt ... staple the shape to the page ... stapling always make me feel I've done something a bit more radical!! Again .. small rebellions ... ;-)
50. Stamped images: If a stamped image comes out imperfect and not fit for the job in hand ... save it for your messier work. Maybe chop it up or punch a shape from it, enjoy it as a background design without it needing to be recognisable.
51. Embossed paper: embossing folders may not immediately strike you as the most avant garde supply in the crafting world but embossed designs, snipped up into smaller sections, make really lovely, textured, additions to collage.
52: Heat embossing: Another of the overlooked / old-school supplies that you really can rehabilitate and use in a freer manner. I wrote a few
'How Tos' on the subject a while back here:
53. Cross stitch fabric: I recently had some tiny scraps of this hanging around ... and they found their way nicely on to a page. Another texture, another way to use white. It doesn't need to make any 'sense' as such ... so long as it works on the page! Same goes for off-cuts of:
54. Fabric: Use it just as you would use your patterned papers.
55.
Mesh: Whether it's a light netting fabric or a plastic mesh, it can all come in useful when layering up interesting textures on a project.
OK, you've done a lot of rummaging around in cupboards so, in case you need to sit and put your feet up for a while, let me offer you
a few easy alternatives to seeking out all your own supplies ...
(e)Supplies you can find in my shop!: I know,
you're quite right, it
is shameless self-promotion .. but if you knew how long this post has taken me to compile ... you'd let me off the hook.
If you like the idea of dabbling in some alternative supplies but you'd prefer someone else to all the searching, unearthing, sifting, sorting, curating and delivering for you ... then
that's what my shop's there for!
56. Challenge me to create a custom 'Plundered Pages' or 'Ephemera Bits' kit: If there's a theme you've been thinking of working with and would like a ready-made pack of papers that fit - without you having to source them all - then pass the job on to me. My recent commissions have ranged from '
Graffiti style' to '
Shabby Chic' and '
Roller Derby' to '
Inside Santa's Grotto'! So, if you have something in mind ..
we can chat about it.
Or else just have a more general browse around as I also sell ...
57. Retro map packs: these contain sections from a selection of different old maps and make lovely backgrounds / areas of colour on a collage.
58. Numbers and Diagrams: Absolutely one of my all time favourite supplies to use is sheets of number text .... not sure why ... maybe it's because it doesn't compete too much with any wording on a page.
Whatever it is ... I like it!
59. Vintage sheet music: always a nice backround design, and always looks great used with inkes and watery paints.
60. Foreign Language text packs: Only 'foreign if you don't speak it of course .. but they always make for interesting snippets on pages. [Pages are available in various different languages - Italian, German, Russian, Polish ... and more ...and if there's anything I might have that you fancy, just ask!].
And a more recent addition to my range is:
61. Collage scrap packs: These are small boosts to your existing supplies made up from all kinds of snippets, off-cuts and chopped up treasures leftover from my own projects. Because someone else's 'bits' are always more intriguing than your own! ;-)
But ... if you don't want to do any of that [I'll try to not take it personally ... ] then ...
(g)Other places to source inspiring / unique supplies:
62. Ebay: But beware ... you can drop in there looking for something as innocuous as
envelopes ... and come away with 20kg of vintage Christmas cards. Ask me how I know ...
63. Car boot sales: Can be hit and miss, but when it's a hit ... ahhhhhh ... it's worth it!
64. Charity shops: Off-set the guilt of buying yet more supplies with donating to a good cause! Win win!
65. Junk shops: Genuine, rummagey, old-tat, shops are getting fewer and far between. Whenever you see one - go in! You never know if it will have been replaced by a takeaway the next time you're passing!
66. Things that drop out of old books! Once you start buying the occasional old book you'll begin to find all kinds of things inside them! I've found notes, postcards and homemade bookmarks amongst other things ... for more on the interesting things left behind visit
Forgotten Bookmarks - a site dedicated to just that!
67. Your own loft: Do you really know what's in there? There might be all kinds of things you've fallen out of love with over the intervening years .... now you can happily chop it up!!
68. Someone else's loft: ... with permission ...
naturally! But who knows ... one man's trash ....
69. The children's sections of craft shops / supermarkets: Kids supplies can actually be pretty inspiring mainly because they 're not the kinds of things we're so used to seeing in regular more 'grown up' sections! [You don't see many stick-on googly eyes in the latest arty-chic scrapbooking ranges do you?]. Plus, things like masks / stencils can be a lot cheaper when manufacturers are aiming them at children ... I got this stencil set for under £1!
70. The children's section in charity shops: Many of my
favourite vintage pages are those which began life as children's books [so much so that I actually have a collection of children's illustrated dictionaries that I
don't cut up! Imagine that!].
Similarly ... continue in the mindset of looking in places you wouldn't normally consider and try this ...
(h)Look where the specialists look!:
Just because you're a paper-crafter with a full and intimate knowledge of every craft shop in a 50mile radius [plus a dozen or so online stores in your Favourites ... ] it shouldn't mean you limit yourself to only using supplies which are connected to
your hobby: broaden your horizons ... and go steal the best bits from other people's hobbies!
71. Use pages from science books, technical manuals, medical books etc: Old books from other fields often have really interesting and inspiring illustrations:
72. Postcard collections: If you spot an old collections of postcards being sold off at a car boot sale, vintage market etc] then snap it up! I used lots of them in my
'30 Postcards to Myself' journal:
73. Stamps: Same as with postcards - if you see a stamp collection going cheap, buy them!
I snapped up a whole collection in a charity shop a while back and it's kept me in colourful little nostalgic rectangles ever since!
74. Sewing patterns: Make use of both the retro designs on the packets and the tissue patterns inside.
75. Patterns inside old craft magazines: When you come across a pile of old crafting magazines at a car-boot etc, don't be put off by the fact you don't actually want to make the items they have patterns for. The patterns themselves are printed on thin, matt, paper then simply use the pattern iself to add an interesting design to a page!
Here's one I made earlier ...
76. Playing cards: Old playing cards often have attractive designs on the reverse.
77. Collectors cards / cigarette cards: These are getting harder to find at an affordable / 'I'm-not-worried-about-cutting-up-collectables-that-might-be-worth-something' price. But if you can find them, snap them up. The vintage illustrations on them really do make special additions to mini albums / journals etc [Like the illustration in the centre below]:
(h)Supplies you can find while you're out and about:
78. Flyers: You never know when there'll be an interesting image / phrase on one. It's occasionally worth allowing the flyer hander-outers to thrust one into your hand. A
flyer that is ...
79. Brochures + free newspapers: Again, they're free and worth a glance. When I'm working on campus there's often a lot of brochures, leaflets etc laying around ... some of which make their way home with me.
80. Paint colour cards / wallpaper / fabric / any commercial samples: Once your redecorating's all done, these can come in useful snipped up and stuck down somewhere other than your living room wall!
Supplies you can find with the help of the 'crafting village':
You know the African traditional phrase that 'It takes a village to raise a child?' well, my friends and I have a saying that it takes a crafty village to make sure a fellow crafter has everything they need!
We generally apply this to the times we're at our monthly crop for example ... if you find you've forgotten a supply you need, or it runs out mid-project ... you're welcome to just yell out and someone will gladly share theirs with you. [We're nice like that.] Or if you go away with us for a crafting weekend and you forget
every craft tool you own because you left your crafting tote behind your front door and didn't see it when you were packing the car ... [but who, who, would do such a stupid thing ... ahem ... ] then someone will make sure you don't go without.
So for my final suggestions I'm going to encourage you to get a little bit social with your supplies:
81. Join in a swap: It could be an official, organised swap [there's often one happening somewhere online, a blog, website, Facebook group] or organise one yourself!
82. Swap with friends / local craft group: Again, this is something my crafty cropping friends and I do. This month we brought items to the crop that we wanted to
sell and I cleared out some old stamps I no longer wanted while someone else got something new and inspiring at a bargain price. Next time round we're bringing things we want to
swap or
give away for free!
83. Someone else's 'bit boxes' and leftovers: My friends and I do this as well: share each others bit bags, offer up any leftovers to whoever wants them before they head for the bin, generally just take advantage of what's a bit 'been-there-done-that' to the original owner ... but which becomes the newest favourite supply to whoever claimed it!
It's like I've always said ... someone else's 'bits' are always more interesting than your own ...
-----------------------------------------
Right then ... while we're in a sharing mood, I'm going to prevail upon your community spirit to reach the goal of '101 alternative crafty supplies + where to find them'!!
I've managed 83 ... so I've opened up Nos.84 - 101 to
your suggestions ... leave your idea in the comments and I'll add them to the list:
Kathrine / Sutty from 'Fruit of my Scraps' contributed:
84. '
Non-sterile medical gauzes which are fairly inexpensive
85. Plasterboard tape
86. Buttons from worn-out clothes
87. Gardener's twine and string
Kirsty Neale of 'Ginger & George' suggested using:
88. Old board games: the cards, pieces and the board itself.
89. Doilies: especially as stencils
90. Pretty / fancy sweet wrappers
91. Wine bottle labels
92. Erasers and corks: for making stamped impressions
93. Cupcake cases: [Kirsty reminded me that I'd actually done a whole '10 Ways with ...' feature for Papercraft Inspirations magazine using them ... but clearly I'd forgotten when it came to writing the list!]
94. Ribbons / trimmings recycled from gift-wrapping or boutique packaging.
95. Clothing catalogues
96. Patterned paper straws [In fact I did another '10 Ways with .. ' feature - with paper straws! How am I forgetting all those?!]
Joanna Caskie of The Craft Croft said:
97. Children's art: I'll let Joanna explain this one herself: "Call me a terrible Mother, but I sacrifice some of my children's artwork for other causes. They produce sooo much so some of it goes on the walls but some can become wrapping paper, birthday cards, collage elements or notebook covers'.
---------------------------------------
If you've found anything in this post useful [goodness knows I hope you have ...or else you're exceptionally hard to please!!] then
it would make my day if you could SHARE, PIN, COMMENT or OFFER A SUGGESTION. Thank you!
Julie :-)
If you've missed any of my earlier posts in the collage + altered book adventure, you can catch up here:
The 'Fortune & Geese Favour the Bold' Itinerary:
Part 1: Prep notes and supplies list
Part 2: Introducing a themed focus into your altered book / journal
Part 3: Turning an old book into a new home for your collage
Part 4: 101 alternative crafty supplies ... and where to find them

.JPG)

.JPG)


.JPG)
.JPG)
.JPG)
.JPG)


.JPG)