Thursday, 14 June 2012

An Art Journal page: from start-to-finish No.2

Hi again.

I shared my first 'Art Journal page from Start to Finish' last summer and according to my blog-stats it's been my most visited post ... which is really good to know.

It's also my most 'pinned' project on Pinterest too ... so I don't think it's too much of a leap to say that somebody out there found it worth reading / useful / interesting ... so I've made another one!

I hope this one reaches those who are interested too, so here goes:
Here's the finished page in question, so you don't have to scoot all the way down to the bottom to see how it turns out in the end!
Now let's go back ... and start from the very beginning ... because it's a very good place to start ...

Like all of my posts this week, today's project recycles rubbish.

This time, the rubbish in question was a hotel booking confirmation print-out which met with a watery end:
As soon as I saw the lovely effect the water had created ... I knew I had to turn it into a journal page!
So I did ...

Step 1 I applied Ranger Distress Stain [in 'Picket Fence'] very roughly and quickly across my journal pages:
My journal is made from handmade, absorbent paper, so I wanted to 'seal' the paper a little bit ... but I'm far too impatient to coat my pages with gesso and wait for it to dry.

Instead, the Distress Stain does a good enough job of making my paper nice and grainy while the sponge applicator means I don't have any brushes to clean up afterwards. [You can imagine how much I relish that task.]

Step 2: I used used gel medium to fix my water-coloured booking-form down across my pages:
Note the plastic glue-spreader. Again: because I'm too lazy to clean brushes.

Gel medium isn't essential to this process. PVA / watered down white glue and even a glue stick would work fine too.

There's just something a little bit smoother and easier to spread about the gel medium, which I like. Also, this particular one dries with a matt finish, preventing all those shiny edges and smears you can get with other glues.

Step 3: I softened the edges of the first layer by adding some snippets of vintage paper down the sides:

Step 4: I applied various shades of spray-ink through a sequin-waste stencil using Cut N' Dry foam:
Just because they're 'spray' inks ... doesn't mean they always have to be used by spraying them directly on to your page. Here I spritzed some on to a non-stick craft mat, picked it up with the foam and then pressed it through the holes in the sequin waste.

Step 5: I lightly spritzed through my favourite sunburst stencil with a complimentary colour:
For the record: I'm a useless stencil-user.

This is mainly because I hate getting ink on my fingers as that means I have to go clean it off and, as we've already discovered, I'm lazy. [And perhaps a bit of a control freak who doesn't like stained fingers ... but let's keep that to ourselves shall we?]

All of which means I don't like to get too close to the spray meaning I don't hold the mask / stencil down properly and never get a clean result. Fortunately I've made peace with my messy ways and I live with the 'arty' effects I end up with ...

Step 6: I scoured my collection of catalogues, brochures and vintage images looking for body parts to use in my focal point:

Step 7: I built up my feature character from more than one source:
When you're building up less than anatomically correct bodies it doesn't mean you shouldn't assemble its various 'parts' with a little time and care.

When the arms, legs, head etc are joined to one another relatively seamlessly, in roughly the right places it helps give the overall effect of creating a 'character' rather than being just some randomly scattered elements and odd parts!

Step 8: I returned to my vintage paper collection to find wording to fit with the theme and feel of the page:

Step 9: I then added some handwritten journaling followed by ink droplets in various shades:
And that's about it for the main page elements really.

There were a few final touches: a little doodling around the figure and the word strips along with a few stamped stars around the edges, but nothing major.

Here's the fished thing once again:

If you've never tried art-journaling I hope this helps persuade you that it's not as complicated as you might think when you're looking at someone's completed pages.

Give it a try, it's not a science, there's no possible way to get it wrong or even to be perfect at it. It's a messy, jumbly, hour of cutting + sticking and making yourself happy.

Go ... enjoy! [And let me know if you do].

Julie :-)
 
---------------------------------
 
Drop by the shop for interesting vintage pages and images to use in your journal.
 

Wednesday, 13 June 2012

Art Journaling: with food packaging [for Rubbish Week]

Hi, hi.

It's day 3 of 'Rubbish Week' ... and it's getting even more rubbish ... in a good way ...

My final prompt  for the UKScrappers Art Journey [a kind of introduction to art journaling] is available to download from today and is based around the theme of recycling 'rubbish' into your journals.

[If you'd like to read the full prompt / general discussion then visit the Art Journey area of the forum here and go to 'Step 23'].

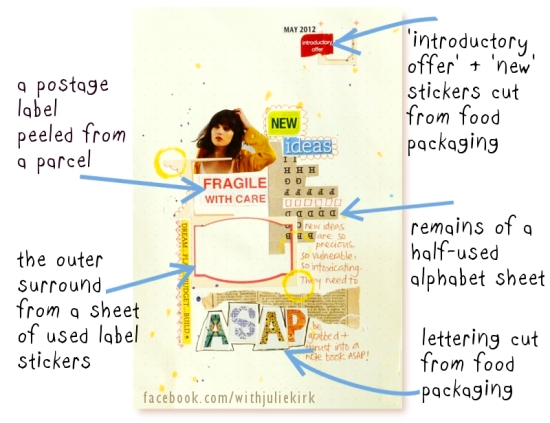
Here's one of the two new pages I made to illustrate my prompt ... now, without cheating, without scrolling down for the answers on the next image [I'll know if you have] ... see if you can you spot the 'rubbish':
[BTW: whoever just mumbled 'the whole page is rubbish' can go and stand outside the room and not return until they've thought hard about they just said.] Moving on ...

OK here's the answers:


 Any surprises? Anything familiar to you and your work?

In case you need proof ... I took a 'before' photo of the food packaging:  
I love everything about that packaging: the patterned lettering, the fonts used ... and the stew inside it!

Now here are those letters once again - rearranged into my page title:
The 'dream, plan, budget, build' word strip was cut from a junk mail leaflet about home-building that was addressed to the previous owners of our house despite them not living here for years ... see? I really do scour just about everything to find a useful snippet or two!

And here are those stickers again - which actually inspired the 'new ideas' theme of the page:
Using the leftover surrounds from a sheet of label-stickers has been one of my favourite additions to projects for a while now. And I can't think of a recent scrapbook page where I haven't used some!

I don't know what it is I like about them ... but I'm quite addicted. I'm probably just being perverse and contrary by preferring the support-act rather than the main-headliner!

It's also had a similar fondness for using sheets of alphabets like I've done here, not for their individual letters, but for a mass effect:
Finally here's a closer look at the little scrap of vintage dictionary I used to balance out the use, and colour, of the alphabet sheet:
It also felt appropriate to use definitions of words such as 'precognition' and  'preconceive' on a page about having ideas!

-------------------------------------------------

Tomorrow I have a full step-by-step showing the making of another new page ... from start to finish.

I had lots of great feedback after the first one I blogged, last summer, and it's been my most 'pinned' project on Pinterest, so I'm hoping some of you will find this one useful too.

So I'll be back with that in 24 hours. See you then.

Julie :-)

-------------------------------------------------

Don't forget the special discount over in my shop this week - just click the image to go for a browse:
  • There's a couple of new Plundered Pages packs in stock there - some of which are perfect for scrapbooking summer photos;
  • and there's the new Plundered Pages 'Serendipity Packs' too - lucky-dip value packets of vintage papers [which, with the 20% discount now come to just £3.20!]

Tuesday, 12 June 2012

Card Making: Using the leftovers from die-cutting [for Rubbish Week]

Hola and welcome to Day 2 of my 'Rubbish Week'.

Today's post is about using leftovers to make pretty cards.

And when I say 'leftovers' I'm talking about paper and card ... and not last night's tea. Because chicken and sweet potatoes don't work that well on cards.

Not even a shaker card.

Anyway, at the risk of bringing up food yet again [eew] ... do you remember the sandwich board cards I made a few weeks back? The ones with the cheeky quotes and matching step-by-step tutorial? Well, when I die-cut the apertures in the front, I held on to the sections that were removed and used them as a layer on some new collage-style scrappy cards:
Here's a better look at one poking out behind the floral illustration:
The colour of this die-cut label was the starting point for the rest of the card and once I'd found a matching illustration [Papermania, 'Lucy Cromwell' Decoupage pack] I used the pink as my second colour and brought in the ticket and the pink gems.

The little snippet of corrugated card I used behind the paper flowers was also a leftover from a previous aperture die-cutting session ...
And here's yet another ... only this time it's the opposite way round - I used the 'positive' shape on something else and had this 'negative' heart left over on my desk:
And with this card I just went a bit pattern crazy:
[At least when I'm indulging my pattern-mania on my cards, I'm not doing it my outfits ... well, mostly ...*thinks about yesterday's floral coat plus floral dress combo* .. OK, maybe I do both at the same time!]

The off-cuts of fabric I used on this card began life as plain white [from one of my Blank Looks kits] and were coloured with spray inks and watered down acrylic paints:
I really keep intending to make and share some projects using these bare materials kits as I really think you'll like them... but it's hard to find time to make pretty things for myself and stock the shop with kits at the same time. One day, I promise!
Before then, if you'd like to try a Blank Looks kit for yourself - or any of my kits all of which feature found or recycled papers and 'bits' .. then here's a little 'Rubbish Week' related offer you can use until Sunday:

Drop in on me again tomorrow when I'll have some 'rubbish' art journaling for you ... 

Julie ;-)

Monday, 11 June 2012

Art Journaling: Recycled, homemade journal [for Rubbish Week]

Hi, hi, hi.

I'm having a rubbish week.

No ... let me clarify that ... my week's going fine [apart from almost stepping on a decapitated baby bird before breakfast] no ...

... what I'm actually having is a 'Rubbish Week': a week of posts, tutorials, ideas, projects etc all on the theme of recycling 'rubbish' into your creativity.

Not that I think of it as rubbish. No, to me it's 'found treasure', 'free stash''a serendipitous starting point' ... and I love it! I think it panders to the part of my nature that looks for the good in things, roots for the underdog, keeps an open mind, gives things a second chance ...

But, whatever it is, it's going to be right here, on my blog, all this week. Starting with an art journal I made for myself from the contents of an Amazon parcel ...
The fact that the paper was actually perforated at regular intervals and that, when folded in half, the sheets looked perfectly page sized was certainly a sign that I had to turn it into a book!

All be it a fairly ramshackle book:
It's two years since I made this journal and I still haven't decorated the cover. It's still the plain chipboard ... but I think I like it like that. I might - add some wording or a title on it to liven it up a little,  eventually, at some point, maybe ...

I decided early on to incorporate into this particular journal all of those bits and pieces :
  • which I hang on to for safe-keeping or because they're pretty, or weird or pretty weird;
  • bits and pieces which I pin to my notice boards or clip-up above my work desk ... and which stay there indefinitely ;
  • bits and pieces which I think 'I could use that' or 'that's too nice to throw away' ...you know the kind of thing ...
And so, occasionally I take them down, unpin them, tip them out ... and glue them in place, safely inside my journal. It's like a little scrap resting place.
Take the first page of the book for example:
It features part of a paint colour strip, a practise photo from my PoGo printer, some old alpha-stickers plus a doodle of a bird and some nuggets of wisdom saved from a daily quotation calendar:
It's really something I should do more often otherwise it's a bit pointless of me to keep all these things 'for later' ... if 'later' never comes! And I think I might start a new journal, maybe more of a 'smash' / old fashioned scrapbook style to speed up the process and get rid of the backlog!

---------------------------------------
 
I'll be back tomorrow with some scrappy, collagey, bits + pieces-y style cards but I'll leave you for now with a special offer to mark 'Rubbish Week':
 
SORRY - BUT THIS OFFER CLOSED IN JUNE 20I2

The shop is built on the philosophy of discovering hidden gems within materials which have been overlooked ... so, if you're as inspired by found treasures as much as I am then take advantage of the discount all this week!

Julie :-)

Sunday, 3 June 2012

Storytelling Sunday: A Kind of Love Story

Hello.

As it's the first Sunday of a new month I'm joining in with Sian Fair's 'Storytelling Sunday' [Sian's story is here and if you visit her blog for the full details you can join in with your own story too].

As regular readers here might have been unable to avoid casually noticed, last month James and I celebrated 20 years together and so - ably assisted by the wooden dolls I painted as an anniversay gift - let me begin today's tale in the manner of all the best love stories ...

Once upon a time ...

... there was a girl:
.... whose big sister would let her go out to the pub with her [I know what you're thinking ... 'this never happened in Snow White...'].

And while she was there, engaging in underage drinking [honestly, it was the odd sneaky cider, we're not talking about binge-drinking here. She used to watch Blossom while she was getting ready to go out for goodness sake, these were more innocent times.]  ... anyway ... while she was there, she met a boy:
Actually no. 'Boy' is stretching it a bit ... he was more of a young man. A young man who belonged to her sister's group of friends, a young man who the girl gradually began to look forward seeing in the pub on Friday nights. And the times he wasn't there just weren't as much fun.

There were a few incidents of [very mild] flirting. He accidentally-on-purpose hurled an ice-cube at her. She once had to climb over him to get out of the booth on the way to the toilet [I know ... it's almost too romantic isn't it?].

Then one day, out of the blue, he phoned her an invited her to the cinema.  And she said yes.

And they were both pleasantly surprised:
When he turned up to collect her he was wearing a plain white t-shirt. She'd never seen him in a white t-shirt before, [she'd seen plenty of black Metallica t-shirts, but never a white one] and she liked it. A lot.

And he smelled lovely. And that kind of sealed the deal. And they've been together ever since:
Granted there's been no glass slipper and no big white fairytale wedding but fairly early on he did buy her a plastic zebra [but you're going to need to read this story, to understand why that makes him, and the zebra, pretty special.]

And just last month she bought him an original copy of the Hitchhiker's Guide to the Galaxy LP, signed by Douglas Adams ... [which makes them just about even in the gift-giving stakes] and round here those are the kinds of things which pass for true romance.
And, as all good fairytales go ... I'm happy to make the prediction that they both live happily ever after ...

------------------------------

Thank you for reading my story today, don't forget that Sian's happy to welcome you aboard the story-train too.

Julie :-)