Saturday, 30 June 2012

My Month in Numbers 2012: June

Hello, hello.

If my calendar is correct then ... it's July tomorrow.

If the recent wet weather is correct then ... I may have a faulty calendar.

But, whichever it is, here's my June 2012 ... in numbers ...

35 years = the time elapsed between the taking of this photo:
... and this one:
Points of note: I now have more hair than I did in 1977. Which is a good thing.

Meanwhile Mam has less hair than she had in 1977 ... also a good thing.

And, coincidentally, Jo is dressed smartly in pretty dresses in both photos while I seem to dress more for comfort and am wearing trousers in both. The more things change, the more they stay the same, no? 

344 pages = the amount of Bring Up the Bodies read since May's Month in Numbers to finish it off.

3 = the number of wives Henry VIII has accrued so far and we're only up to book 2 of Hilary Mantel's trilogy. *spoiler alert for anyone unaware of how Henry VIII treated his wives*  

They cut her head off in the end you know?

But, seeing as how I knew that before I began, I was never actually reading to find out what happened ... I had half an idea how it all went down [to be honest it sometimes less than half ... royal History isn't my strong point].

No, rather this was one of those: "I want to keep reading because I love the atmosphere , the writing, the fully breathing characters inside yet ... I really don't want to keep reading because then it will be over and I won't be wandering around 16th Century England with Thomas Cromwell any more ... I'll be back in my own bedroom again, with hoovering to do" books.

You know the kind.

3 days = the time I had to wait between seeing a pair of these leopard print jeans in a shop and having a pair arriving on my doorstep after having to run home and order them in my size:
Animal print. Super comfy and stretchy. Look cute with ballet pumps.

Rarely does an item of clothing fulfil so many vital requirements!  

2 = the number of Christmas themed magazine features I've worked on:
It took me a whole [pretty much wasted] working day - mid-June - to get even remotely in the mood for such festivities.

Oh by gosh, by golly.

13 out of 13 =  the number of the final episode of Justified Season 3.

I didn't want it to end but we made sure to see it out instyle with an end-of-season 'event'.

If you don't watch Justified then what follows here will make very little sense. And even if you do watch Justified ... you may still have your doubts ...

We ate had southern style chicken and ribs and drank Kentucky Bourbon and Coke from jars ... Harlan County-style:
I wore my best Boyd Crowder outfit ... and we all took turns wearing the Dickie Bennet moustache:
Let me tell you something ... it's not easy to drink from a jar wearing a felt 'tache stuck to your top lip with blu-tack. Not easy at all:
And yes, my sister is wearing a Sheriff badge here. Because, while we may be slightly unhinged, we're not lawless ...

13 = the number of episodes in Season 1 which I'm now going to buy and start watching the whole thing all over again ... after seeing them all twice already. 

Oh, amazingly well-written, well-acted and just plain entertaining Justified, I really wasn't a box set girl ... until I met you.
----------------------------------------------
Well, that's me ...

If 'My Month in Numbers' is new to you, you can catch up on all of the details here.

And you'd like to join in this month [despite seeing me in a moustache] here's the Month in Numbers 'etiquette':If you write a post and want to leave a link for myself and others to visit and/or pin please bear in mind it has a shared experience aspect to it.
  • When you swing by my blog to drop off a link to your Month in Numbers post - please leave a comment for me while you're there. Not because I'm needy ... but because it feels fair. Reciprocal.
  • Please link to my blog in your post. As much as I'd like to think that everyone who reads your blog already knows what 'My Month in Numbers' means... the truth is, they don't. So unless you explain where the idea comes from and how your readers can join you in doing the same next month, they are none the wiser.
  • Please take time at some point in the month to visit and comment on a few of the other posts too.
----------------------------------------------

Just a note:  [mainly so I can't be accused of breaking my own rules ... ] ;-)
  • this is a scheduled post as I'm away from the online world for a few days ...
  • so if you have left me a comment and a link to your own Month in Numbers post then please don't be offended when I don't comment on it or pin it straight away.
  • I still like you.
  • Obviously.
  • I'll be catching up with your vital statistics ASAP once I'm back online.
  • I promise!
----------------------------------------------
Thanks for dropping by and humouring me today.

Happy July everyone!
Julie :-)

Tuesday, 19 June 2012

Outfit: My 'summer' wardrobe?

Hello, hello.

I'm British ...

... and therefore I'm contractually obliged to blog about the weather at least once a season. At least once.

It's only polite. So here goes ...

One day last week - in the middle of June - I knew I had to go out to the shops and chose my outfit accordingly.

 Now, seeing as it's the middle of June [ie: summer] you might imagine that this would involve a floaty dress, sandals, sunglasses and carefree sun-kissed hair.

Well [a] you'd be wrong, and [b] you're also probably not living in the UK this summer ... because if you did, you'd know that my outfit needed to be more like this:
Let me just break this summertime ensemble down for you, it involves:
  • Bertie boots. When I bought these last September I joked that "I might live in them now". Many a true word spoken in jest.
  • Jeans.
  • Striped long sleeve T-shirt.
  • Spotty vest.
  • Baggy cardigan.
And not forgetting two of the most important elements of the outfit ... namely...
  • A scarf. A scarf!! Have I mentioned it's June?
  • And a floral print rain mac.
The mac was a £5 bargain bought in a winter sale when I imagined I'd look chic wearing it during spring showers ...

And yet here I am ... still wearing it in 'summer' and as if that wasn't bad enough last week I caught a glimpse of myself in it in a car window. Its shiny fabric meant it was slipping off my shoulders under my bag strap and my hair was all mushed about from wearing the hood. and,  do you know what I looked like?

I looked exactly like my 6 year-old self at home time from school. That's what I looked like! C'est la vie.

But let's not get too despondent, the sun's shining today and I've almost managed to forget the weather forecast this morning which said we were in for "a few days of sun ... followed by a few days of wind and rain".
Right ... I'd better go now and make hay. How about you?
Julie :-)

Friday, 15 June 2012

Found Poetry & Floor Gazing Philosophy

Hi, hi, hi.

Over the course of any given week I cut up lots of paper.

It might be for my own creative projects, scrapbook pages, art journaling, cardmaking etc ... or it might when I'm working on kits and paper packs for my shop ... but whatever it is for, it's constant: there's hardly a day goes by when a leaf of an old book isn't cut loose from the rest or a specific sentence isn't seized upon and snipped free.

But ... cutting out one section of a sentence, means leaving another section behind. And cutting out lots of images for Plundered Pages packs, means some wording is left stranded.

So, in a labour of love, I've been cutting up anything leftover from my wordy dissections and have compiled little packets of wild and wonderful phrases. [The first of which have found their way into these art-journaling packs]:
But now ... these by-products have create by-products of their own: I now keep coming across little surprise messages which have wandered from the word-herd and fluttered to the floor or drifted across my desk.

 Messages such as ...
Which is always good thing to be reminded of. Don't you think?

And so, for a couple of weeks, whenever I've found one of these random messages I've scooped it up and placed it on my shelf, for safe keeping, under the watchful eye of a few good friends:

BTW: ... just to balance out the sublime with the ridiculous ... on the day I photographed these found - and profound, messages ... I also found:
...  a bead, a butterfly and a bran flake. Which have their own special qualities no doubt ... but they're not quite as poetic ... especially the bran flake.

Anyway ...

After a while I took the snippets down from the shelf and began shuffling them around until - from entirely random phrases - I found a poem. 

This poem:
If you needed to read this message today ... then I'm glad it found you too.

Julie x

Thursday, 14 June 2012

An Art Journal page: from start-to-finish No.2

Hi again.

I shared my first 'Art Journal page from Start to Finish' last summer and according to my blog-stats it's been my most visited post ... which is really good to know.

It's also my most 'pinned' project on Pinterest too ... so I don't think it's too much of a leap to say that somebody out there found it worth reading / useful / interesting ... so I've made another one!

I hope this one reaches those who are interested too, so here goes:
Here's the finished page in question, so you don't have to scoot all the way down to the bottom to see how it turns out in the end!
Now let's go back ... and start from the very beginning ... because it's a very good place to start ...

Like all of my posts this week, today's project recycles rubbish.

This time, the rubbish in question was a hotel booking confirmation print-out which met with a watery end:
As soon as I saw the lovely effect the water had created ... I knew I had to turn it into a journal page!
So I did ...

Step 1 I applied Ranger Distress Stain [in 'Picket Fence'] very roughly and quickly across my journal pages:
My journal is made from handmade, absorbent paper, so I wanted to 'seal' the paper a little bit ... but I'm far too impatient to coat my pages with gesso and wait for it to dry.

Instead, the Distress Stain does a good enough job of making my paper nice and grainy while the sponge applicator means I don't have any brushes to clean up afterwards. [You can imagine how much I relish that task.]

Step 2: I used used gel medium to fix my water-coloured booking-form down across my pages:
Note the plastic glue-spreader. Again: because I'm too lazy to clean brushes.

Gel medium isn't essential to this process. PVA / watered down white glue and even a glue stick would work fine too.

There's just something a little bit smoother and easier to spread about the gel medium, which I like. Also, this particular one dries with a matt finish, preventing all those shiny edges and smears you can get with other glues.

Step 3: I softened the edges of the first layer by adding some snippets of vintage paper down the sides:

Step 4: I applied various shades of spray-ink through a sequin-waste stencil using Cut N' Dry foam:
Just because they're 'spray' inks ... doesn't mean they always have to be used by spraying them directly on to your page. Here I spritzed some on to a non-stick craft mat, picked it up with the foam and then pressed it through the holes in the sequin waste.

Step 5: I lightly spritzed through my favourite sunburst stencil with a complimentary colour:
For the record: I'm a useless stencil-user.

This is mainly because I hate getting ink on my fingers as that means I have to go clean it off and, as we've already discovered, I'm lazy. [And perhaps a bit of a control freak who doesn't like stained fingers ... but let's keep that to ourselves shall we?]

All of which means I don't like to get too close to the spray meaning I don't hold the mask / stencil down properly and never get a clean result. Fortunately I've made peace with my messy ways and I live with the 'arty' effects I end up with ...

Step 6: I scoured my collection of catalogues, brochures and vintage images looking for body parts to use in my focal point:

Step 7: I built up my feature character from more than one source:
When you're building up less than anatomically correct bodies it doesn't mean you shouldn't assemble its various 'parts' with a little time and care.

When the arms, legs, head etc are joined to one another relatively seamlessly, in roughly the right places it helps give the overall effect of creating a 'character' rather than being just some randomly scattered elements and odd parts!

Step 8: I returned to my vintage paper collection to find wording to fit with the theme and feel of the page:

Step 9: I then added some handwritten journaling followed by ink droplets in various shades:
And that's about it for the main page elements really.

There were a few final touches: a little doodling around the figure and the word strips along with a few stamped stars around the edges, but nothing major.

Here's the fished thing once again:

If you've never tried art-journaling I hope this helps persuade you that it's not as complicated as you might think when you're looking at someone's completed pages.

Give it a try, it's not a science, there's no possible way to get it wrong or even to be perfect at it. It's a messy, jumbly, hour of cutting + sticking and making yourself happy.

Go ... enjoy! [And let me know if you do].

Julie :-)
 
---------------------------------
 
Drop by the shop for interesting vintage pages and images to use in your journal.
 

Wednesday, 13 June 2012

Art Journaling: with food packaging [for Rubbish Week]

Hi, hi.

It's day 3 of 'Rubbish Week' ... and it's getting even more rubbish ... in a good way ...

My final prompt  for the UKScrappers Art Journey [a kind of introduction to art journaling] is available to download from today and is based around the theme of recycling 'rubbish' into your journals.

[If you'd like to read the full prompt / general discussion then visit the Art Journey area of the forum here and go to 'Step 23'].

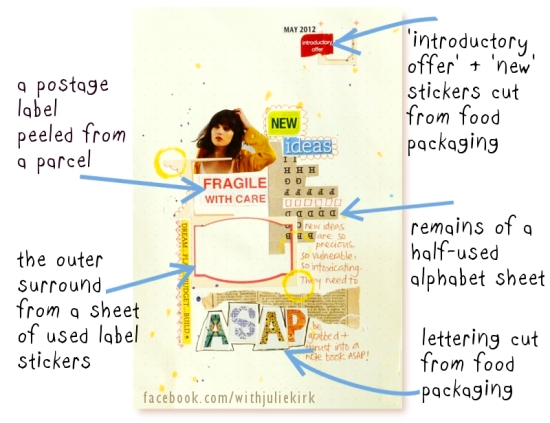
Here's one of the two new pages I made to illustrate my prompt ... now, without cheating, without scrolling down for the answers on the next image [I'll know if you have] ... see if you can you spot the 'rubbish':
[BTW: whoever just mumbled 'the whole page is rubbish' can go and stand outside the room and not return until they've thought hard about they just said.] Moving on ...

OK here's the answers:


 Any surprises? Anything familiar to you and your work?

In case you need proof ... I took a 'before' photo of the food packaging:  
I love everything about that packaging: the patterned lettering, the fonts used ... and the stew inside it!

Now here are those letters once again - rearranged into my page title:
The 'dream, plan, budget, build' word strip was cut from a junk mail leaflet about home-building that was addressed to the previous owners of our house despite them not living here for years ... see? I really do scour just about everything to find a useful snippet or two!

And here are those stickers again - which actually inspired the 'new ideas' theme of the page:
Using the leftover surrounds from a sheet of label-stickers has been one of my favourite additions to projects for a while now. And I can't think of a recent scrapbook page where I haven't used some!

I don't know what it is I like about them ... but I'm quite addicted. I'm probably just being perverse and contrary by preferring the support-act rather than the main-headliner!

It's also had a similar fondness for using sheets of alphabets like I've done here, not for their individual letters, but for a mass effect:
Finally here's a closer look at the little scrap of vintage dictionary I used to balance out the use, and colour, of the alphabet sheet:
It also felt appropriate to use definitions of words such as 'precognition' and  'preconceive' on a page about having ideas!

-------------------------------------------------

Tomorrow I have a full step-by-step showing the making of another new page ... from start to finish.

I had lots of great feedback after the first one I blogged, last summer, and it's been my most 'pinned' project on Pinterest, so I'm hoping some of you will find this one useful too.

So I'll be back with that in 24 hours. See you then.

Julie :-)
-------------------------------------------------

Don't forget the special discount over in my shop this week - just click the image to go for a browse:
  • There's a couple of new Plundered Pages packs in stock there - some of which are perfect for scrapbooking summer photos;
  • and there's the new Plundered Pages 'Serendipity Packs' too - lucky-dip value packets of vintage papers [which, with the 20% discount now come to just £3.20!]

Tuesday, 12 June 2012

Card Making: Using the leftovers from die-cutting [for Rubbish Week]

Hola and welcome to Day 2 of my 'Rubbish Week'.

Today's post is about using leftovers to make pretty cards.

And when I say 'leftovers' I'm talking about paper and card ... and not last night's tea. Because chicken and sweet potatoes don't work that well on cards.

Not even a shaker card.

Anyway, at the risk of bringing up food yet again [eew] ... do you remember the sandwich board cards I made a few weeks back? The ones with the cheeky quotes and matching step-by-step tutorial? Well, when I die-cut the apertures in the front, I held on to the sections that were removed and used them as a layer on some new collage-style scrappy cards:
Here's a better look at one poking out behind the floral illustration:
The colour of this die-cut label was the starting point for the rest of the card and once I'd found a matching illustration [Papermania, 'Lucy Cromwell' Decoupage pack] I used the pink as my second colour and brought in the ticket and the pink gems.

The little snippet of corrugated card I used behind the paper flowers was also a leftover from a previous aperture die-cutting session ...
And here's yet another ... only this time it's the opposite way round - I used the 'positive' shape on something else and had this 'negative' heart left over on my desk:
And with this card I just went a bit pattern crazy:
[At least when I'm indulging my pattern-mania on my cards, I'm not doing it my outfits ... well, mostly ...*thinks about yesterday's floral coat plus floral dress combo* .. OK, maybe I do both at the same time!]

The off-cuts of fabric I used on this card began life as plain white [from one of my Blank Looks kits] and were coloured with spray inks and watered down acrylic paints:
I really keep intending to make and share some projects using these bare materials kits as I really think you'll like them... but it's hard to find time to make pretty things for myself and stock the shop with kits at the same time. One day, I promise!
Before then, if you'd like to try a Blank Looks kit for yourself - or any of my kits all of which feature found or recycled papers and 'bits' .. then here's a little 'Rubbish Week' related offer you can use until Sunday:

Drop in on me again tomorrow when I'll have some 'rubbish' art journaling for you ... 

Julie ;-)

Monday, 11 June 2012

Art Journaling: Recycled, homemade journal [for Rubbish Week]

Hi, hi, hi.

I'm having a rubbish week.

No ... let me clarify that ... my week's going fine [apart from almost stepping on a decapitated baby bird before breakfast] no ...

... what I'm actually having is a 'Rubbish Week': a week of posts, tutorials, ideas, projects etc all on the theme of recycling 'rubbish' into your creativity.

Not that I think of it as rubbish. No, to me it's 'found treasure', 'free stash''a serendipitous starting point' ... and I love it! I think it panders to the part of my nature that looks for the good in things, roots for the underdog, keeps an open mind, gives things a second chance ...

But, whatever it is, it's going to be right here, on my blog, all this week. Starting with an art journal I made for myself from the contents of an Amazon parcel ...
The fact that the paper was actually perforated at regular intervals and that, when folded in half, the sheets looked perfectly page sized was certainly a sign that I had to turn it into a book!

All be it a fairly ramshackle book:
It's two years since I made this journal and I still haven't decorated the cover. It's still the plain chipboard ... but I think I like it like that. I might - add some wording or a title on it to liven it up a little,  eventually, at some point, maybe ...

I decided early on to incorporate into this particular journal all of those bits and pieces :
  • which I hang on to for safe-keeping or because they're pretty, or weird or pretty weird;
  • bits and pieces which I pin to my notice boards or clip-up above my work desk ... and which stay there indefinitely ;
  • bits and pieces which I think 'I could use that' or 'that's too nice to throw away' ...you know the kind of thing ...
And so, occasionally I take them down, unpin them, tip them out ... and glue them in place, safely inside my journal. It's like a little scrap resting place.
Take the first page of the book for example:
It features part of a paint colour strip, a practise photo from my PoGo printer, some old alpha-stickers plus a doodle of a bird and some nuggets of wisdom saved from a daily quotation calendar:
It's really something I should do more often otherwise it's a bit pointless of me to keep all these things 'for later' ... if 'later' never comes! And I think I might start a new journal, maybe more of a 'smash' / old fashioned scrapbook style to speed up the process and get rid of the backlog!

---------------------------------------
 
I'll be back tomorrow with some scrappy, collagey, bits + pieces-y style cards but I'll leave you for now with a special offer to mark 'Rubbish Week':
 
SORRY - BUT THIS OFFER CLOSED IN JUNE 20I2

The shop is built on the philosophy of discovering hidden gems within materials which have been overlooked ... so, if you're as inspired by found treasures as much as I am then take advantage of the discount all this week!

Julie :-)