
It's been over a year since I shared one of these photo step-by-steps [there must be a BIG secret cupboard somewhere where all the time goes because I don't know where it went ... ] and so, as I've had a little breathing space this week, I felt it was about time I share another!
My earlier step-by-steps can be found here:
- An Art Journal Page: from start-to-finish No.1 'These New Lands' and ...
- An Art Journal Page: from start-to-finish No.2 'Too Precious to Waste'
THIS TUTORIAL IS FOR YOU IF ...
- you'd like to try out a new creative outlet that doesn't involve investing in expensive new supplies
- you've been thinking of trying out art journaling but don't know where to start
- you've seen some amazing finished art journal pages and are now afraid that it's a dark art ... that there's a great artistic mystique to it, that it's not for you
- you're at your best when you can break down a technique into manageable chunks [perhaps due to time, physical or psychological constraints]
| *Pin / save this page for future reference! |
- One of these relies mainly on layers of paper and collage elements ... which is the style I find easiest to work on while curled up on the sofa in front of the TV!
- Meanwhile the other is the one I turn to when I have more time to play - and when I'm sitting at a safe distance from anything I can stain .. and this one involves more paint, sprays, stamps, masks/stencils and general messiness!
THE FINISHED PAGE - 'Pain Has a Thousand Faces':

It's always a leap of faith when I decide I'm going to take step-by-step photos of a process ... as I've absolutely no plan and no idea as to how the finished thing will turn out! My biggest fear is always that after putting in so much time into stopping and starting to take the photos as I build the page ... that the end result won't be worth it!
And, if I'm honest, there were a few stages of this page's development where I really just wanted to close the book and forget all about it. But ... I persevered and am fairly happy with it now.
Happy enough to make a full tutorial from it anyway!
And, if nothing else, it affords me the opportunity to share my own creative insecurities with you ... so hopefully, even if you've been unsure of making a start, you might feel more able to give it a try yourself!
Here goes ...

The grid I've used here is just a section of cheap plastic embroidery canvas and it's one of my favourite ways to add patterns to my pages. I spray through the grid then flip it over and press the reverse pattern on to the page.
Alternatively you can try sequin waste, cheap alphabet stencils, lace, the surrounds from sticker sheets and chipboard letters ... anything which you don't mind getting ink on in fact!
STEP 2: Squirt a light shade of acrylic paint directly on to the page and spread it around the edges

I know there are lots of quality paints available - and undoubtedly they each serve a purpose - but, for me, when I just want to add colour and mess around, when there's no great need for the paint to do anything specialised ... I'm happy to buy the cheapest general craft paint I can find.
My sponge is actually Cut N Dry foam which I use with all my ink pads, spray inks and paints.
STEP 3: Add scraps of patterned paper using a gel medium [or PVA/white glue if you prefer]

Whenever I mention that I use gel medium I get asked [a] if it's necessary and [b] where to find it and so ...
- [a] It's up to you, but personally I find gel medium is smoother and easier to spread than sticky white glues like PVA. And it definitely sticks firmer than just a glue stick.
- I tend to spread it not only on the back of the items I stick down but also over the top as a way to 'seal' it and to really flatten out any curling edges.
- and [b] it's often sold next to tubes of artists paints in art + craft shops. Mine came from my local Hobbycraft.
STEP 4: Add more stencilled designs over and around the scraps of paper

STEP 5: Add more paper scraps in a nice flowing arc ...

Well next time you come across one have a look inside for those pattern sheets because - while you may not want to make the project they're from - they make really interesting background designs and textures on your mixed-media work! That's what I've used here:

STEP 6: Stamp general / abstract / background designs around the edges of the page using a similar shade of ink* to your background colours [*thanks to Kate Crane for that top tip!]

I used the Infocrea 'Abstract' stamp set above and again here, this time in a light yellowy-orange to compliment my existing shades of green and blue:

However ... if you've gone a little too far with any of this layering at [for example here I stamped in a grey that came out drab and dark and I just didn't like it] then DO NOT DESPAIR!!
You can always ...
STEP 7: Assess areas of the page that would benefit from some white paint or Gesso to brighten them up / hide mistakes!

STEP 8: Browse through old books, magazines, junk mail, leaflets, catalogues etc for an interesting image

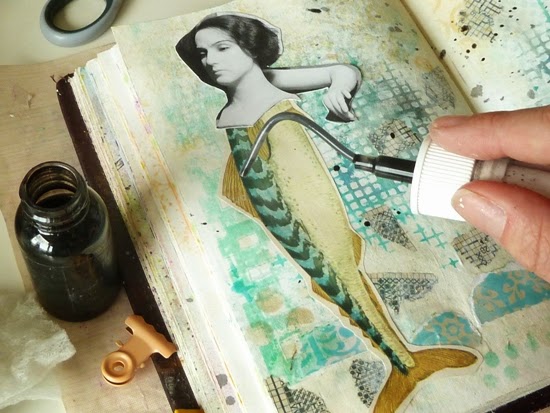
Here the body of the fish came from an old children's' encyclopaedia and the mannequin head came from a promotional postcard for an opera that fell out of my weekend newspaper supplement ages ago [I'd been hoarding it safely ever since!]
Use gel medium again to fix it to the page.
STEP 9: Unscrew the nozzle from a bottle of spray ink and tap it so little drops land on the page
STEP 10: Sift through a variety of old book pages until a phrase or two finds you - then cut it out

Take inspiration from the image you chose - let your mind wander to what it represents to you - or what it could represent if you let it ... and just skim read through your pages. Then inevitably something leaps out at you and just feels appropriate for that page.
Small confession: I selected the phrase below before I selected my focal image and instead browsed for images I felt could represent it. But whichever way around you do it image then wording / wording then image ... it's when they work together that your journal page will gain a cohesive narrative. Tell a clear story.

The phrase above was a chapter title from a medical research book while the snippets below are taken from a 1960s novel for teenage girls and a kids' annual:

Anyway ...
...if you can't face cutting into a book yourself or you'd like some 'new blood' to add to your old paper collection then have a browse around the Plundered Pages section of my shop.
STEP 11: Assess if the page needs a final splash of colour. Like neon green. And if it does ... then splash it on!

And I was much happier after that zesty colour boost!
As you can see I stamped over the image in places - just to help it settle down into the page so it didn't feel too free-floating.

Or however a half fish / half mannequin would sit on a page!
STEP 12: Add some 'journaling' ...
Now for the big question people ask about art journal pages: do I really have to write on them?
To which I'm going to reply ...
- Nope. It's entirely your call. You're a big girl/boy now [most likely bigger than me] so I'm not going to force you to do anything!
- I hadn't intended to write on this page at all
- I wasn't entirely sure where the feeling behind my snipped phrases had come from [like I say - it found me] and so I wasn't sure I had anything to add anything right at that moment however ...
- I left it overnight and, when I came back to it the following morning I was reminded of a quotation that just seemed perfect for it. So I added that, by hand, around the outside edges:

So, what do you think?
- Does art journaling feel do-able yet?
- Has it helped you break down what a page can consist of?
- Are you relieved to learn that white paint is the enemy of mistakes?
- Do you see how there's no 'right' way to begin ... or to continue ... but that you just keep adding and tinkering and browsing?
I'd love to hear your feedback
- so do leave a comment here with any thoughts, ideas or questions [I can't reply directly through my comments - but do try to answer people's queries in one way or another!]
- or drop by my Facebook Page and
- if you use Pinterest please consider pinning the tutorial so other people can find it too.
I'll look forward to hearing from you and seeing any pages you might make after reading through the steps again!
Julie :-)
---------------------------------------------------------
Supplies:- For a wide selection of original vintage pages and eclectic collage ephemera - ideal for finding your focal images and word snippets - do visit my Etsy shop. There's all kinds of all kind waiting to be discovered!
- Shimmerz spray inks
- Lost Coast Designs 'Zebra Stripe' border stamp
- Infocrea 'Abstract' stamp set
- Tando Creative 'Sequin Waste' mask
- Lily Bee patterned papers
Daler Rowney Gel Glaze Medium - Matt
Inkssentials Cut N Dry foam
Ranger Archival Ink - Viridian
Hero Arts Neon ink - Green
American Crafts 'Amy Tangerine - Ready, Set, Go' roller date stamp


Beautiful! I really need to restart my art journal. I feel it helps me be more creative.
ReplyDeleteI'm not really into art journaling....but this would also work really well for a mixed media canvas.Love your finished page.
ReplyDeleteThank you so much Julie - - - you have answered a lot of questions about something I am always planning on trying, but have never had the confidence to do as yet, even though I have lots of suppliesI can utilise. I am off now to read your other page instructions - thank you again. J x
ReplyDeleteI answered yes to all your questions at the beginning of your tutorial,. At the end of it I wished it wasn't midnight and far too late to start. I'll be back tomorrow afternoon...
ReplyDeleteFab tutorial in your own inimitable style Julie, love how fresh it looks !
ReplyDeletelovely tutorial. art journaling can seem quite intimidating at times. thanks for the reminder that it needn't be. I think of my art journals (yes, I have more than one) as somewhere for my creative, arty doings to live, without any pressure to be anything more than just my messing about messy times, with occasional slightly profound(to me)words
ReplyDeleteGreat tutorial! I'll definitely be back to study it in more detail. I like that you don't overdo your pages. I have trouble learning to love white space in my own work.
ReplyDeleteRinda
gorgeous! Thank you!
ReplyDeleteAnother brilliant post, and I know I am one of those who have helped bump up your page views on your previous ones! Always a delight to see how you work and hear your encouraging voice and honesty about the decisios you make. Yes, definitely going to do a page!
ReplyDeletereally helpful and well done...simple and easily approachable Thank you for showing the end results at the beginning and end.
ReplyDeleteYou make it look so easy!! Your work is really good!!
ReplyDeleteYour tutorials have been fantastic - both as an introduction and inspiration - I've been afraid to art journal before despite admiring others work as I've been worried about how it will all flow, if at all! Now I realise it's not about creating perfection (something I need to let go of in 2014!) and just about putting my creativity down on paper :) I've been a creator/paper crafter nearly all my 40+ years but in a very controlled /stifled manner ;)
ReplyDeleteFabuleos tutorial and work too. TFS.
ReplyDeleteI've been art journaling for years (I should get paid for it!) and I love that you are teaching others to enjoy and love it too! These posts are all wonderful and I'm so glad you are teaching people how simple and wonderful it can be!
ReplyDeleteSo I have had this pinned on Pinterest for quite some time. I had some time to sift through my creative pins and I find yours, by far, is the easiest to follow. Thank you for sharing your talent.
ReplyDelete