Thursday, 15 May 2014

How to transform a box frame into a printer-tray style display case. [Zebras are optional]


Hi hi.

If you were here the other day - when I posted about the progress I've made in my work room redecoration project - then you'll have heard me mention I was also decorating a little somewhere where my zebra collection could thrive too.

And here it is ... complete with directions on how you too can up-cycle a cheap/old box frame into a fancy custom display case!

 
[With thanks to Effie of Efemera Ink who first introduced me to this technique a few years ago.]

WHAT YOU'LL NEED
  • A box style picture frame
  • Sandpaper
  • Paint [regular white emulsion will do]
  • Paintbrush
  • Thick cardboard / grey board /chipboard
  • Old book pages
  • PVA / white glue / gel medium etc
  • White acrylic paint / gesso / Distress Stain [I don't know about you but I can never keep a straight face while referring to 'Distress Stains'. Oh my.]
The box style picture frame:
  • The size and depth of this will depend on what you plan to display in it afterwards. Mine's deep enough for my zebras. [A phrase you won't hear that often.] 
  • As you're going to paint and customise it you needn't worry about finding a 'perfect' example.
  • Keep a look out for them in charity/thrift shops, car boot sales etc and remember - it doesn't matter how ugly the thing is .... you're going to cover over it all eventually. Just enjoy the bargain!
  • Mine was something James spotted a skip and brought home for me years ago [it's been lurking in a cupboard ever since ... until inspiration struck last month!]
  • And, for this style of 'printer-tray' style project the box doesn't even need to have glass in it ... mine didn't, and you don't need it.
PREPARING THE FRAME
  • If you're going to paint your frame give it a quick sand first. There's no need to try to remove every last trace of the original colour; just sand it enough to give the paint something to grip to.
  • Then paint over it using ... anything you've got handy!
  • I covered over the horrible reddish fake-mahogany on mine with the same white satin paint I'd been using to refresh the woodwork in my craft room:
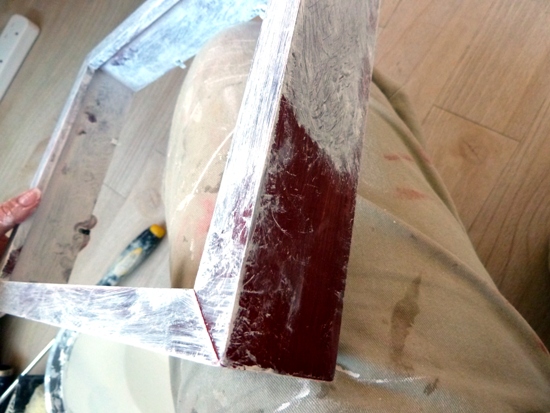
  • If yours is bare untreated wood then acrylic paint would cover it easily.
  • If it needs a few layers then give it a quick sand down in between coats. The end result will be worth the extra effort.  
  • Once the paint is completely dry sand over the frame to distress the edges and corners.
  • I used quite a course grade sandpaper for this, which gives quite a scratchy texture, a finer grade will give a softer effect.
  • Don't press too hard at first, just get a feel of how much paint is coming away each time. It's easier to sand over it again to take more off than it is to go back and re-paint the whole thing!
  • Finally spray on some furniture polish or apply some wax and buff.
So, that's the exterior seen to; let's move indoors now shall we?

CUSTOMISING THE INTERIOR

You need some sort of base structure on to which you can build up your shelves / dividing strips. This part is all going to depend on the size and shape of your frame plus what kind of insert/backing structure it came with ... so bear with me!
  • Mine came with this 4-sided grey board/chipboard type box insert already inside:
  • But if yours simply has the back section [that you would normally use just as the back of the frame] then that should work almost as well. You might need to secure your shelves a tiny bit more, but it's not a major issue.
  • Plus you'll need to 'wall paper' around the inside walls of your frame before adding the insert with the shelves too.
  • And if you've simply salvaged an empty frame with no insert or backing at all ... just cut yourself one from a sheet of grey board,  a sturdy cardboard box or even the backing board from a few A4 notepads glued together.
You then need to decide:
  • How many shelves you want and how you're going to position them.
  • You can also add uprights/ vertical dividers in the exact same way I'm about to show you for the shelves.
  • When arranging your dividers just keep in mind the size of the items you plan to display in the frame - then base your layout on that.
  • After all your hard work you'll want to make sure the precious items you want to show off will actually fit inside!!
Next ...
  • Cut shelves from a sturdy cardboard box [as I did here] or grey board etc to fit inside your base structure.
  • Measure and mark out in pencil where you want them to sit:
Now you need to anchor each shelf in turn to your base. Here's how:
  • Add a slosh of water to a tub of PVA glue [How much is a slosh? I don't know! I just know you don't want to water the glue down too much ... you want just enough to make it 'glide' across the paper more easily, that's all!].
  • Tear strips from the pages of an old book.
  •  [I used an old French botanical book - pages of which can be found inside the  Modern European Language vintage pages packs available from my Etsy store. Or, if you'd like a custom order of just these papers, get in touch!]
  • Apply the glue to the paper using a brush then stick the paper to one of your cardboard shelves.
  • Make sure to leave at least a few centimetres over-hanging the edge:
  • Now fold the overhanging section over on to itself, position the shelf where you want it, then press the excess paper down on to your base structure:
  • Think of this part as adding a bracket support to a shelf!
  • Repeat the process of adding paper brackets all the way along the top and bottom of each shelf you add.
  • You may need to allow one coat of glue to dry before adding more layers as your cardboard and can get too damp and begin to bend, buckle and the paper starts to drag and tear.
  • Keep repeating the hinging process it until each shelf begins to feel secure enough to take the weight of the treasures you'll be displaying on them!
FINISHING TOUCHES
  • You also need to cover the entire backing board with scraps of torn paper overlapping one another - and overlapping the brackets of the shelves too.
  • The finished result should be random - no need to be methodical of neat here!
  • Just keep adding sections of paper alternating their size and direction - until the whole thing is covered.
  • Paint over each layer of paper with glue as you go along to seal any loose edges.
  • If your frame didn't come with a cardboard insert, remember to wallpaper the inside walls of the frame to match!
Tip: If you don't want a shiny finish to the final layer of paper ... use a Matt Gel Medium rather than PVA to apply it. You can use Gel Medium throughout the entire project if you want but PVA is cheaper.
  • Finally, just to 'knock-back' the finished text-print design wash over it with either watered down white/cream acrylic paint or gesso or a Distress Stain in 'Picket Fence' as I did here:
  • A quick wipe around, blending out the colour with a damp paintbrush, should be enough. You don't want to cover the text print altogether.
  • Leave to dry and then ...
... that's it! You're done!

All that's left to do is:
  • Hang your frame on the wall, or stand it on a shelf then introduce your treasures to their new home.
Here's how mine turned out ... once I'd moved a few stripy friends in:
 And here are some close-ups so you can see the shelves more clearly ... and so you can meet the zebs.

You can see how the shelf just blends into the background [and also how terrified/hostile these 3 little ones look in their new abode]:
The 'Wade Whimsie' zebra knows someone's behind him ... but is too polite to just turn around and stare ...
Two old ones I bought to give away ... and, erm, never got around to letting go ...
And the man himself.

The one who kick-started my collection.

The one so famous he just goes by a single name: Zebra. [Hey, I didn't say it was an original name!]
And finally, the nice, chunky, depth of my frame means I can also stand some of the bigger boys on the top. Both of these were gifts from friends:
For an alternative design ... here's one I made earlier - only this was made entirely from scratch from grey board using no original wooden base frame whatsoever:
You can see lots more images of this particular project in my post here.

But I'll leave you with the latest version once again:

------------------------------
 
If you're inspired to try something similar yourself ... link me up, send me a photo ... whatever. I'd love to see your interpretation of this custom display case from an old box frame.

And if you're not planning to make on right now please pin this post for future reference!
 
If you've enjoyed this post please share it by whatever means you share things: Pinterest, Facebook, Twitter, Tumblr, crop circles, semaphore ...

Any support for my free tutorials is most appreciated!

Julie x

Monday, 12 May 2014

Extra Padding: The Push-Up Bra Approach to Blogging needs *you*!


Hi you.

How does this sound?
Before you say anything, I know.

When you give a post the title "The Push-Up Bra Approach to Blogging needs you!" ...

... it really ought to be accompanied by an image of someone in a push-up bra pointing out of the screen to you like the Lord Kitchener wartime poster. And all I'll say to that suggestion is ...

... after you!

Moving swiftly on ...

Believe it or not it's been over a year since I first published my free, metaphor-heavy, motivational series The Push-Up Bra Approach to Blogging!
  • Over a year since we looked at ways we can all blog more often without it overtaking our lives;
  • Over a year since we learned how with our blogs, as with a good push-up bra, we can all make the most of what we've already got!
  • Over a year since, together, we raised over £500 for Save the Children charity in the duration of the series.
 Over a year!! Can you believe it?

Clearly time flies when you're blogging more often and with more confidence! Or are you?

I know from personal experience, and from conversations I've had with some of you on my Facebook page, that as useful as the original series was in helping lots of us feel more motivated to blog and more happy with our online content ... a lot of forgetting and falling back into old habits can happen in a 12 month span too!

And so ... I'm going to be embarking on a little push-up bra 'refresher' course.

Over the coming weeks I'll write a few posts reminding you of, and pointing you to towards, various aspects of the original course content.

A note to all self-starters or those of you who are new to my blog and to Push-Up Bra Blogging:
  • ALL OF THE CONTENT IS AVAILABLE - for instant access - RIGHT NOW HERE. THERE'S NO NEED TO WAIT!
  • Plunge right in!  
  • Work through the 12 chapters [for free] at your own pace whenever you like!
  • No need to stand on ceremony here!
Plus over the coming weeks, as I remind you of OR introduce you to the Push-Up Bra's hints, tips and philosophy ... I'm sure I'll be sneaking in a few new thoughts and updates too.

And here's where you can get involved!!

I'd like to hand part of this re-cap over to you. On your blogs. And the way I see it working is something like this ...

Hello Push-Up Bra Blogging alumni!
  • Are you one of the bloggers who, last year, worked through the course materials?
  • Which elements did you apply to your own blog?
  • Which of the 'approaches' did you put into action?
  • Which parts of the course made a positive change to the way you thought about your blog ... and maybe even yourself?
  • 12 months on ... how is your blog/attitude to blogging different to it was prior to reading the series?
OK then ... now I've got you thinking about it ...

Would you consider writing a blog post about your experience of the series?
  • Your post could be as long/short/broad/specific as you fancy.
  • It could simply be about one small change you made or share one tip you remember from the series.
  • It could have a link back to the series page ... so your readers know where to find it.
  • It would be great to think that people new to the series [which was, and remains, entirely free to access!] could learn from your experiences  and feel motivated to follow along themselves!
Reasons you might like to take part:
  1. Because ... you like me. [If this isn't the case ... feel free to keep that info to yourself ... and I'll carry on in blissful ignorance.]
  2. Because ...  in order to make my advice memorable to you I gave it a title that's had an interesting knock-on effect to my SEO.  [Let's just say that over the last 12 months some people using the search term 'push-up bras' must have been really disappointed to have landed on a series about blogging tips ...]
Additional reasons you might like to take part:
  1. It'll give you something fun to share on your own blog. Woohoo!
  2. I'll promote your post  across social media [potential new blog readers; new sets of eyes!] as follows ...
  3. If you link up to me in your post then send me a link I'll share your post on my Facebook page [which currently has 427 likes].
  4. If you include an image/photo I'll also pin your post to the Push-Up Bra Blogging 'Extra Resources' Pinterest board [which currently has 694 followers]. [I can only pin a post that contains an image because that's how Pinterest saves posts]
  5. And I'll Tweet it too! [Where I have 1019 Twitter followers.]
And if you're new to the series ...

Hello Push-Up Bra Blogging newbies!
Do you wish you had the time or inspiration to blog more often? Do you keep promising yourself you'll blog more regularly? Do you wish you could blog as confidently as some of the bloggers you admire? 
If you do and you feel like getting more comfortable in your blog space then I'd say you're ready for a fitting for your first Push-Up Bra Approach!  

Would you read the series and write a blog post about your experiences as you work through it applying what you're learning to your own blog?
  • It would be great to hear feedback from you as you took on board those hints and tips you felt were most useful.
  • You could simply blog about one single small thing that's working for you.
  • No pressure ... just a fun post!
Reasons you might like to take part:
  1. See the reasons for the alumni! Plus ...
  2. If you've been looking for a good reason to invest some time and effort into a new or neglected blog ... then here's all the excuse you'll need! You're testing a theory!! One which compares blogging techniques to padded bras, freezer meals, Kenny Rogers and more ...
  3. And ... it's an easy way to get one of your posts seem by lots of new readers!
-------------------------------------------
 
OK ... that's it. I'm all out of persuasion here! So:
  • Have a think ...
  • Have a read ...
  • Wait for my refresher posts  ... OR else leap straight in now ... whichever!
  • And if you do get around to writing a post [any time at all between now and whenever!] link me up and I'll swing by to share your post when I can.
I'll look forward to hearing from you!

Julie :-)

Friday, 9 May 2014

Creating Space :: Another 8 days of office reorganisation. [And a herd of zebras takes up residence]


Hey you. It's me.

Here's a second look inside my Creating Space office redecoration project. Fortunately for you, you get to look from a distance; any closer and I'd have dragged you in here to sort through a box or hold a tape measure for me.

[The first instalment was here ... in case you missed the part that made me cry!]

So here are days 8 - 15. Not that the days are necessarily consecutive ... I'm afraid I'm not dedicated enough to tackle it day in day out;  more like 'as and when'. But I am chipping away at it!

Day 8: How has it taken so long for me to do this?
A good proportion of my work for crafting magazines involves card making and yet ... until now I'd been storing my card blanks in a box [albeit a nice box!] on the floor, beneath another [nice] box. Let's just say reaching for one wasn't exactly ergonomic.

And now? Now they're all on a shelf in the cupboard directly behind me when I'm sitting at the desk making it so easy to swivel around in my chair, open the door and grab what I need. Makes perfect sense!

It also proves to me exactly why - as stressful and as messy as it's been - it really was necessary for me to have reconsidered where every single thing in the room was best suited.  

Day 9: Feeling a little exposed...

After re-painting I didn't put my old curtains back up straight away as I thought it would spur me on to get the new ones made.

In reality it just led to the bin men, road cleaners, neighbours directly opposite plus any one passing by having a really good view of me sitting at my desk adding kits to my shop and die-cutting!

I put the old curtains back up the following day.

Day 10: Organisational advice Coldplay*-style

I used to have all these rolls of wrapping paper, speciality papers, tubes etc standing in a basket on the floor. But in this tiny space floor space is at a premium and, once I'd moved everything out ... I liked the feeling of space it created. So I looked for an alternative storage spot:
Then ... in the opposite direction ... I swapped out the 5 green plastic boxes beneath the cupboards for these cream 'Curver 'My Style' storage baskets which I found at The Range: 
[*'High up above or down below' is a line from Coldplay's Fix You.]

Day 11: Beginning to see some progress [and some flooring]!
My poor spare room has been awfully put upon lately. But I'm finally making a dent in all the rubbish!

Day 12: Adding a personal touch
The sorting process unearthed an old box frame that I'd always planned to do 'something' with and, as I wanted to bring some personal touches into what was so far a pretty efficient/mundane redecoration I had an idea of what that 'something' could be!

So, I sanded it, painted it white, distressed it and hung it on the wall ...

Day 13: Filling the frame 

The frame came with a card tray insert and I thought that, with the addition of a few new cardboard shelves, it would make the perfect home for my collection of zebras.

[Yes, I have a collection of zebras, if this is news to you, you might need to read this.]
I have a few more photos of this upcycling-in-progress which I think I'll share in a post of their own soon, so you can see how you too could turn a boring old frame into your own printer-tray type display.

And the fact that I do indeed own a zebra collection might just help explain my choice of curtain fabric ...

 Day 14: There in black & white

I finally felt motivated enough to make the curtains which, I now realise, are not the first pair I've made but the first pair I've made to hang in my own house ! Well, it's only taken me 10 years to get round to it!

Day 15: Curtains!

In curtaining, as in cups of tea first thing on a morning and TV adaptations of Sherlock Holmes ... 2 are so much more welcome than 1.

So I finished up my curtain making on Day 15 and I now have a matching pair:
My window was small enough, and my fabric wide enough, that I could've made the stripes run either way. But horizontal won out in the end.

And I'm very happy to report that, the stripes have not dazzled my eyes into a migraine as I had once feared they might!

Oh and on the subject of messing with your eyes ...

How's this for camouflage?
Clearly I'm naturalising into my new environment rather nicely!

Julie x

Wednesday, 7 May 2014

Creating Space :: DIY paper-covered doors


Hello hello.

I'm happy to report that, in my grand 'Creating Space' office redecoration project progress [along with two curtains and even more mess] has been made!

You might remember - either from my earlier 'work in progress' post or if you've landed on my Facebook page in the last few weeks - that I'm turning down the colour dial in there.

There's just something sharp and clean about black and white that I find really appealing right now and so I'm exchanging colourful busyness for monochromatic restfulness.

Just think of it as a reverse Wizard of Oz or Pleasantville.

But this desaturation process meant I had to refresh my Technicolor paper-covered boiler cupboard doors [try saying that fast 3 times and see how far you get!].

So - should you wish to try something similar in your own space - here's a quick look at how I did it.

DIY paper-covered doors


BEFORE: [but it's also kind of after too ... let me explain ... ]
Yes, these are the cupboard doors before I decorated them last month ... but, obviously, they'd been decorated previously!

It must be close to 10 years ago when I first covered them with my favourite bright, graphic print scrapbook papers so they needed a change really.

[Actually those of you out there whose Mastermind topic would be to identify the range and brand of any given sheet of 12x12 might be able to recognise and date these designs better than I!]

But ... if your doors aren't already decorated, then just treat the photo above as another 'after' image to inspire you ... and take the photo below as the real 'before':  
PREPARATION:
I didn't actually do anything to prepare the doors before I covered them.

Because I'm lazy a rebel like that.

The base was just the old, yellowing, paint that was there when we moved in, and hiding that with patterned paper was certainly more fun than repainting them with white gloss!

However ...
  • if you've got a particularly uneven surface;
  • or if your cupboard doors will be handled often [mine are hardly ever opened];
  • or you're just more professional than I am ...
You could always sand the surface of your doors first to  create a 'key' for the adhesive to grip to.

But now the boring work's out of the way let's move on ...

DECORATION:

Here's what you'll need:
Papers:  here I used a couple of full sheets plus scraps of patterned scrapbook 12x12 papers but you could use anything at all such as:
  • wrapping paper;
  • sheet music;
  • old book pages;
  • tickets, labels, ephemera etc
If you're using heavily patterned designs or a mix of colours, then consider the position of each individual scrap as you go along; so that the overall effect is a balanced one.

eg. don't have too many solid colours together in one corner then a cluster of prints in the other. Spread them out around the entire surface; think of it as a patchwork quilt design with a nice spread of designs around the finished surface.

Adhesive: This time around I used Anita's Tacky Glue [Anita didn't mind.] Which is just a kind of PVA glue. It's not a specialist glue for this kind of thing and regular PVA would work just as well.
  • I poured some of the glue onto a non-stick craft mat and kept a pot of water next to it.
  • Rather than water the glue down exactly, I just kept dipping my paintbrush into the water before dipping it into the glue. It just helps to move the glue around more easily. 
  • Then, once I'd decided where my scrap of paper was going to go, I pasted the slightly watery glue on to the back.
At this stage you're ready to start covering up that uninspiring white gloss!
[NOte: I mention a 'clean' brayer ... be careful all that previous inky/painty fun you've had with your brayer doesn't end up smeared across your fresh new papers!]

Wriggle the paper into position - to line it up with the edge of the doors - before the glue sets [which will depend on the temperature of your room.]

And just keep adding papers until the whole expanse is covered. That is ...

... unless, like me, you're hanging notice boards / white boards / magnet boards on to the doors too. If so you only really need to cover the areas that will be visible surrounding the boards.

TIPS:
  • Keep the papers flush to the front of the doors; unless you are using very thin paper DON'T try to wrap/return them around the edges. This will cause too much creasing and will most likely catch when opening and closing the doors.
  • 'Sealing': I didn't feel the need to 'seal' the end result with anything. However ... if your project is going to be handled frequently [eg. a chest of drawers or your wardrobe] then you might need to protect it from daily wear and tear.
  • Book pages etc can be sealed with a watered down PVA or a layer of Glaze Medium [you can get Matt mediums if you don't like the idea of having a shiny finish].
  • However ... I'm not sure that all scrapbooks papers would respond happily to this method. If I did try it I'd definitely choose the Matt option.
And really ... that's all there is to it! Here's the finished result:

AFTER:
And finally ...

... if you've been inspired to give it a go in your own room, or even on a smaller project ... you're welcome to link me up to your version any time.

Visit me here on my blog, on Twitter or on my 'WithJulieKirk' Facebook page and let me see!

Oh and ... importantly ...
 
I thought I was smiling. 
 
I was wrong!
 
-----------------------------------------------------
 
If you've enjoyed this post, or found it useful ... or if you just think the world needs to see my sad little 'why are you making me do this?' face ...
 
... then please pin this tutorial to Pinterest or share it in whichever way you share things!
 
Thanks in advance.
 
Julie x

Sunday, 4 May 2014

Overheard: Because it's the 'cake' part that's bad for you


Hi you.

While tidying out my craft room [a task which, at times, has resembled and archaeological dig] I unearthed a sheet of paper, torn from a notebook, containing a few overheards I'd scribbled down on our annual summertime trip to Lincoln last year. And, as we're in a Bank Holiday kind of mood here ... I thought I'd share ... enjoy ...

Because it's the 'cake' part that's bad for you.

Date: 07 July 2013
Location: lunchtime in a tearoom in Lincoln, England.

While we were eating our lunch an elderly man came in, sat down at the table closest to the serving counter, and began browsing the specials board, trying to decide what to order. From the way the lady running the café spoke to him it became clear he was a regular.

A regular whom, on that day at least, had some specific, if not entirely consistent dietary requirements ...

Café lady: We've got a lovely cheesecake if you'd like some?

Elderly chap: It looks lovely but ... I've been told to cut down on my fats and cheeses.

[Do bear this point in mind as you read on ...]
 

Café lady: OK.

Elderly chap seemingly considering something less dairy based: Are jacket potatoes on the menu today?

Café lady: Yes, but I don't know if we've got any of your usual cheese filling left. I can do you a mix of the cheeses we do have though, if you like?

[Well no, he's been told to cut down on fats and cheeses ... so we know how he's going to answer. Don't we?]

Elderly chap: Yes please. [Oh, I guess we don't know then ...]

Café lady looking into the chiller cabinetStilton?

Elderly chap: Yes. [And he's not done just yet ...]

And ... any Cheshire?

Or Cheddar?
Café lady:  Yes. I can do you a mix of those.

Elderly chap:  ... and Feta.

Feta would be nice.

[But still no cheesecake. Heaven forbid!]

---------------------------------------------------------------------

Not that I'm in any position to judge the man's weak will when it comes to cheeses. The images I've used in this post today come from a scrapbook page I blogged a few years ago here which told the tale of a very similar cheese-heavy lunch I had with friends. And then ...

... there's the story of the cheese we had to leave out on a window ledge one time. And even, like today, another overheard which involved elderly gentlemen cheese.

I think it's best I stop there. I know it's good to have a blogging niche ... but this is just getting silly...

For other non cheese related overheards you can visit the link page here [the list needs updating though].

---------------------------------------------------------------------

If you think you know someone who'd like my overheard today ... do share / Facebook / Pin/ Tweet etc. There's not nearly enough cheese-themed humour on the internet right now ...

Julie ;-)