Monday, 1 July 2013

My Month in Numbers: The Communal Count! #1


Hello hello.

When I ended June's Month in Numbers post yesterday I promised you the new month would bring with it a new Month in Numbers activity for us all to take part in and so ...

... welcome to both July and the inaugural Month in Numbers Communal Count!

[A word to the wise: if you ever plan to write about the Communal Count on your blog - which would be perfectly lovely - may I firmly suggest you proof read your post veeeeeerrrry carefully. One lost vowel and we'll be in a whole world of trouble. Just saying ... ]

Anywhooo .....

Thank you so much for all your great suggestions for the kinds of things we could all count up throughout the months to compare and contrast in our Month in Numbers posts.

I've made a list of them all - shuffled them into several categories - and you'll gradually see questions inspired by them appearing here over the months to come.

Even with taking suggestions from so many of you - there are always going to be categories that you just don't fit into to ... but in an attempt to please more of the people more of the time ... I've decided to offer up 2 options per month ... so you can choose the best fit for you.

And here are the first 2 options:
*Pin or save this for future reference
 So ...
  • you're welcome to answer either, neither, or both!
  • it really is entirely up to you
  • you're welcome to interpret them however you like - you might want to count up everyday in the month, or just pick out one day where you'll do a spot-check and write down the number. Whatever you choose is fine!
If you don't usually join in with My Month in Numbers because you don't want to create a full blog post ...
  •  at the end of July you're welcome to just join in with your responses to these shorter questions by leaving a comment on my July Month in Numbers post 
  • OR - join in with your response on my Facebook page where I'll also post this month's questions

And if one/both of the subjects don't apply ... don't let that stop you joining in!!

REMEMBER: My Month in Numbers is never really just about the numbers
  • it's more like how a combination lock unlocks the chain around your bike wheels 
  • and how your PIN number unlocks your bank account ...
  • these numbers are just a 'way in' to the fun stuff, the important stuff  ...
  • they crack open the story of your day-to-day life and allow you to share it with your online friends.
So, for example:
  •  you don't think you can answer one of this month's questions because you don't carry a bag around with you, or you don't take any photos.  
OK, no need to feel left out, you can still join in ... your answer could read something like:
  • "0 = the number of items I carried around in an everyday bag because ______and_______ but if _______ then _____ and maybe ______"
  • Or something like that!
  • Even if your number was 'zero' ... your story counts just as much as if it was 500.
It's the stories we're sharing ... tracking our similarities, our differences, our individual quirks, traits, loves, hates and much more.

So, get that bag and/or camera out ... and your notebook ... and get communally counting in July!

Julie :-)

Sunday, 30 June 2013

My Month in Numbers 2013: June


Hi, hi.
  • If you're checking out My Month in Numbers after seeing my article in Jot Magazine then ... Yay! Hello. Come in, come in. Isn't Jot great? You're welcome to have a look around and see how things work.  OR ...
  • If you've heard of My Month in Numbers and are planning to give it a go this month for the first time [I know a few of you have mentioned that was your plan] then ... Hurrah! I told you it was easier than you first thought!  Link me up! I can't wait to see your debut! AND ...
  • If you're a longstanding Number-counter then ... Hello you. You're looking delightful today. Must be all those numbers you've collected. They're clearly doing you the world of good.
  • NOT FORGETTING ... Anyone who just likes to have a read through everyone else's monthly summaries - that's fine by me. You're always so well behaved, I hardly know you're there.  
  • [If, by any chance, you hate numbers and don't like the way this post is heading then ... here, let me gently usher you out ... come back next month ... ]
OK, now we're all acquainted ... let's make a start ...

100 Years = 8th June 2013 marked the centenary of the death of suffragette  Emily Wilding Davison

I've got no photograph to represent this number yet because ... if you're reading this post on the day it goes live then I'll be attending part of the Beamish open air museum 'Suffragette Celebration Weekend' ... so, expect plenty of photos of the day's events to come!

As it turns out 2013 is not just the anniversary of this particular landmark in women's history ... it also marks the 200th anniversary of the publication of Jane Austen's Pride & Prejudice ... which is where my next set of numbers come in ...

23, 24, 25 = the number on our tickets when my Mam, sister and I went to see costume  historian Gillian Stapleton deliver her 'Jane Austen's Wardrobe' presentation
I took photos of these beforehand thinking [correctly as it turns out] that they'd take our tickets off us when we arrived. It's almost as if not everyone's a scrapbooker and they just don't understand the importance of keeping this kind of ephemera! I really should have asked to keep it shouldn't I?

1790s - 1820s = the time period -in costume - covered in the presentation
Picture the scene: the beautiful space of the Reference Library [think 'tiny portion of Hogwarts library]; rows of wooden chairs with monograms carved into the back and with comfy cushions on the seat; a room full of 'ladies of a certain age' ... and ... an hour long presentation all about history of the kinds of costume worn by Jane Austen's heroines with readings from Austen's novels and letters.

Fashion history is one of my longest standing interests - I remember an infant school visit to a museum where I used my 'spending money' to buy a colour-in poster of fabulous Victorian / Edwardian outfits. And as much as I loved the prose in last year's BBC Hollow Crown Shakespeare adaptations ... I was just as enraptured with the leather-work of the costumes. And don't even get me started on the millinery in ITV's Miss Marple ...

But I digress! In short ... it was a perfect afternoon for me! [Thank you Jo + Mam for humouring me and coming along! xx]

Chapter 49 = the chapter of Austen's Emma I just had to go and revisit after the presentation!
I think it was that outfit [on the left in the photo above] that really gave me the urge to revisit Emma and - more specifically - to wallow in the love declarations of Mr Knightley which, for me ... are quite simply some of the most romantic words ever ...

"I cannot make speeches, Emma," he soon resumed; and in a tone of such sincere, decided, intelligible tenderness as was tolerably convincing. "If I loved you less, I might be able to talk about it more."

[And yes, I am swooning as I type!]

Oh and, while we're on the subject of books ...

4 = the number of books I read  [all of which are now linked-up on my Pinterest board
  • The appropriately numerical Eight White Nights by Andre Aciman
  • The Manual of Detection by Jedediah Berry [if you like Jasper Fforde - this might be for you
  • The Silver Linings Playbook novel by Matthew Quick [the film-makers kept pretty faithful to this original story - so if you liked the movie - you will probably like the novel]
  • and The Messenger of Athens by Anne Zouroudi
2 miles = the approximate distance of the new route I've been taking on my morning walks
I feel like I say this on a near daily basis but ... I don't have a smartphone which means I don't have any apps that can measure the distance I've walked or the number of steps I take. So I've had to gauge this distance using Google maps. And the silly thing [for someone who counts things every month] is that I haven't kept track of how many times I've walked the route ... so I don't know my total!

And talking of walking ...

£3 = the amount I paid for these lovely frilly pink pumps in the sales [shown here standing before wording on the floor of the MIMA gallery. And yes, I did relax and wonder about Carl Andre's work.]
For £3 I can even overlook the fact that they kind of nip at my Achilles heel a little ...

4 = the number of craft magazine projects I worked on 
And half of them  were ... brace yourself now for I'm about to drop the 'C' word ... wait for it ... they were Christmas projects!

It's the same schedule every year and yet every year if feels so very unnatural to have to 'Ho, Ho, Ho' in June!

And finally ...

23 = the number of bloggers who linked me up with their May in numbers
Seems like memory-keeping-by-numbers is getting very popular with people called 'Jo'!

And the number of names on that list that begin with a 'J' is giving even my local crop a run for its money where ... at any given time we can - confusingly- have in attendance:
  • a Jean
  • a Jackie
  • a Janet
  • a Judith
  • two Julies
  • a Julia
  • ... and one of the aforementioned 'Jo's!
OK ... so that's my facts and figures for June ... and now, whether or not your name begins with J ...

Here's how YOU can join in with us:
If you've never joined in before there's a lot more information on the Month in Numbers page - including a 'How To' guide to inspire you. [You don't need to follow any guidelines other than those I'm about to set out below ... everything else I'll leave up to your own creative  interpretation!]
**Please note: I can only 'pin' a post to the board if it contains at least one image/photo. Otherwise I can only leave a comment and smile at you from a distance**

So ... if you want to share a link to your Month in Numbers post / photo / layout etc for me to then visit, comment on, and pin to the communal Month in Numbers Pinterest board then ...
  • Leave a link to your numbers in a comment on this blog post ... but ... 
  • When you swing by my blog to drop it off - please leave a comment for me while you're there. Not because I'm needy ... but because it's nicer if you don't just throw your link on my table and leave without saying hello!  
  • Please remember to link to my blog in your post. As much as I'd like to think that everyone who reads your blog already knows what 'My Month in Numbers' is [hey, it's nice to be popular, right?] ... the truth is, they don't. So unless you explain to your readers where the idea comes from and how they can join in too, they'll never know.
  • And finally ... please try to take time at some point in the coming month to visit and comment on a few of the other posts too. It really does help build a community both around My Month in Numbers .. but also around your own blog space.
If - after reading through all the info on the Month in Numbers page of my blog - you still have any questions just get in touch. My email's in my right sidebar as are the links to my Facebook page and Twitter.

And, if you're waiting for the topic of our first big 'Communal Count' - where we'll all count something similar over the coming month and share our results at the end - then come back tomorrow ...

Thanks for coming today. See you tomorrow. Happy July to you!

Julie

Friday, 28 June 2013

Summertime Photography Scavenger Hunt 2013: Tilting at windmills


Hi again.
[If you want to play along with the Summertime Photography Scavenger Hunt then make sure to visit Rinda over at Gallo Organico for all the details.]

So ... I've got another item to cross off my list  ... but I'm pretty sure you're going to accuse me of cheating.

And yet ... here it is anyway ... [I'm a rebel like that.]

Item No.16: A windmill
This is the label inside my gorgeously soft black leather bag [the kind of bag of simplistic-perfection I'd been seeking for a long time!] and, while it may not immediately seem connected to summertime life ... I promise you it is.

During the summer I work from home and my days are as flexible as my deadlines and self-discipline will allow. And on some of those days - although far fewer than you might imagine - I take myself out on a little shopping trip. The kind that doesn't involve bread, milk and toilet roll.

And so, after doing a spot of invoicing over breakfast ... I decided I'd worked hard enough over the previous week that a new dress might just be in order. So out I went. Which is what I was doing when I realised that I actually didn't need to go hunting out that windmill ... and that I had one with me all along.

[I know... it's like the ruby slippers of the bag world!]

I was in my car, leaning over into the passenger seat, rummaging in my bag to check I'd put my phone in there, when I spotted it:
Note how I'd packed the essentials of a British summer in there ... with my flowery rain mac nestling against my sunglasses!

And on the outside of the bag ... another windmill for good measure:
So that's my case for adding this windmill logo to my list of summertime treasures found! I know it's not a 'real' one ... but then neither were the giants that Don Quixote thought he'd found when he spotted windmills in the distance!
 
Needless to say ... if I find a 'real' one [a real windmill that is ... not a real giant ... ] I'll snap that too.
 
Julie :-) 
 
p.s: If you're a Month-in-Numbers blogger/doer/sharer [hey, we need to work on a better title for us all than that one ...] then just a reminder that we're getting to that time.
  • My numbers will be here on Sunday ...
  • ... but you're welcome to join me anytime afterwards.
  • And if you fancy joining in but haven't been counting anything all month - don't let that stop you ... just flip through the photos you've taken or your diary / blog / Twitter feed / Facebook timeline / Instagram  ... anywhere you keep a record of your days ... and just pick out some facts and figures from there. Sorted!

Thursday, 27 June 2013

Summertime Photography Scavenger hunt 2013: the MIMA edition


Hello, hello.
 
When I first began typing out this post my hair was still drying out from the rain I got caught in on a very short walk/ sprint out of the downpour. And - for the record - no, that 'shower-proof' mac I mentioned last week really isn't deluge proof. I refer you to one very damp shirt as evidence! 
 
But all this rain can mean only one thing ... that it's summer in England! and so ... let's get on with crossing some more photos off that Summertime Photography Scavenger Hunt list ...

[If you want to play along with the Summertime Photography Scavenger Hunt then make sure to visit Rinda over at Gallo Organico for all the details.]

------------------------------------------------------------

All of today's items were captured last week when my Mam, my sister and I went into Middlesbrough to attend the Jane Austen's Wardrobe presentation given by costume historian Gillian Stapleton. But before the event we had lunch in and a browse around MIMA [our local modern art gallery] and the town square surrounding it which is where I found ...

Item No.3: City Hall, Capitol or other similar civic building

This is the first of two items I snapped that same afternoon that not only fulfil the brief set by Rinda ... they rather helpfully have their category written on them to prove it! So - as the sign above the door here suggests - here's the Civic Centre:
Now if only Rinda's list had asked for 'a cyclist doing a wheelie' too ... I'd have been ecstatic to have another one to cross off my list at the same time! Did you spot him?

Item No.9:
A photo with someone or something that is clearly out of place or doesn't belong ...

This is the MIMA gallery garden with the 100 year old Central Library backing on to it. So far so what you'd anticipate seeing in a town centre.

But ...

...  what are those things in the floor there?
Why those are two giant Boeing aircraft engines from decommissioned military surveillance planes which have subsequently had anti-depressants tucked away inside them by artist Roger Hiorns in a piece called Untitled (Alliance).

But you knew that really didn't you? You were just teasing ...


Item No.10: A bench that is outside ...


Don't believe me that this is indeed a bench?

Think that my mother's just been clambering on a modern art installation?
Well think again ... and read the small print at the bottom of the photo!

And here it is from the side:


Item No.13: A fence ...

This metal fence [that reminds me of church organ pipe] surrounds the MIMA garden.

And finally for our little trip around MIMA ...

Item No.18: Your local pub/bar, coffee house or tea shop ...
OK , so this isn't my local café per se. [It's a 15 minute drive away].

But then ... I've never been into the pub that's nearest to my house and alas ... we don't have any cafés or coffee shops nearby either. [Not unless you count those few tables in the fish + chip shop ... and I don't.] I'm afraid café culture hasn't really hit close to our estate just yet and so ... the MIMA café, which we visit fairly often, will have to do.

But if I visit one closer to home before the end of the hunt ... I'll share that one too!

----------------------------------------------------

In case you're ever in the area and get the urge for some modern art and a nice cuppa - here's the MIMA website.

Right .... I'll go and cross these 5 off the list ... and  I'll see you soon.

Julie

Wednesday, 26 June 2013

An Art-Journal Page: from start-to-finish No.3 'Pain Has a Thousand Faces'

Hello, hello.

It's been over a year since I shared one of these photo step-by-steps [there must be a BIG secret cupboard somewhere where all the time goes because I don't know where it went ... ] and so, as I've had a little breathing space this week, I felt it was about time I share another!

My earlier step-by-steps can be found here:
.. and they're some of the most popular, most visited and most commented upon posts I've created .... so I really hope this new one find the right people once again.

THIS TUTORIAL IS FOR YOU IF ...
  • you'd like to try out a new creative outlet that doesn't involve investing in expensive new supplies
  • you've been thinking of trying out art journaling but don't know where to start
  • you've seen some amazing finished art journal pages and are now afraid that it's a dark art ... that there's a great artistic mystique to it, that it's not for you
  • you're at your best when you can break down a technique into manageable chunks [perhaps due to time, physical or psychological constraints]
*Pin / save this page for future reference!
When I'm not attending a class or experimenting with any new techniques I tend to revert to two styles of Art Journaling which feel most natural to me:
  • One of these relies mainly on layers of paper and collage elements ... which is the style I find easiest to work on while curled up on the sofa in front of the TV!
  • Meanwhile the other is the one I turn to when I have more time to play - and when I'm sitting at a safe distance from anything I can stain .. and this one involves more paint, sprays, stamps, masks/stencils and general messiness!
And that's the one we're going to lift the lid on today ... so be prepared to get a little inky with me ...

THE FINISHED PAGE - 'Pain Has a Thousand Faces':
It's always a leap of faith when I decide I'm going to take step-by-step photos of a process ... as I've absolutely no plan and no idea as to how the finished thing will turn out! My biggest fear is always that after putting in so much time into stopping and starting to take the photos as I build the page ... that the end result won't be worth it!
 
And, if I'm honest, there were a few stages of this page's development where I really just wanted to close the book and forget all about it. But ... I persevered and am fairly happy with it now.
 
Happy enough to make a full tutorial from it anyway!
 
And, if nothing else, it affords me the opportunity to share my own creative insecurities with you ... so hopefully, even if you've been unsure of making a start, you might feel more able to give it a try yourself!
 
Here goes ...
 
STEP 1: Spritz a blank page using spray ink + a mask 
You don't have to have any special stencils or masks for this step.

The grid I've used here is just a section of cheap plastic embroidery canvas and it's one of my favourite ways to add patterns to my pages. I spray through the grid then flip it over and press the reverse pattern on to the page.

Alternatively you can try sequin waste, cheap alphabet stencils, lace, the surrounds from sticker sheets and chipboard letters ... anything which you don't mind getting ink on in fact!


STEP 2: Squirt a light shade of acrylic paint directly on to the page and spread it around the edges
I have a thing for white, off-white and cream paints - I always find they come in useful for both a base layer and also on top - when the page might need a few highlights.

I know there are lots of quality paints available - and undoubtedly they each serve a purpose - but, for me, when I just want to add colour and mess around, when there's no great need for the paint to do anything specialised ... I'm happy to buy the cheapest general craft paint I can find.

My sponge is actually Cut N Dry foam which I use with all my ink pads, spray inks and paints.

STEP 3: Add scraps of patterned paper using a gel medium [or PVA/white glue if you prefer]
Any scrapbookers and cardmakers amongst the wannabe art journalers take note: your existing stash will combine perfectly well with your new hobby so there's no great need to buy lots of new supplies*.  [* rest assured that this isn't to say you're not allowed to go and buy more if you so wish!]
 
Whenever I mention that I use gel medium I get asked [a] if it's necessary and [b] where to find it and so ...
  • [a] It's up to you, but personally I find gel medium is smoother and easier to spread than sticky white glues like PVA. And it definitely sticks firmer than just a glue stick.
  • I tend to spread it not only on the back of the items I stick down but also over the top as a way to 'seal' it and to really flatten out any curling edges.
  • and [b] it's often sold next to tubes of artists paints in art + craft shops. Mine came from my local Hobbycraft.   
STEP 4:  Add more stencilled designs over and around the scraps of paper

STEP 5: Add more paper scraps in a nice flowing arc ...
Do you have a pile of old craft magazines lurking in your attic? The kind that included pull-out patterns for embroidery designs and so on? Or do you ever spot any old issues in charity shops or car-boot sales etc? 

Well next time you come across one have a look inside for those pattern sheets because - while you may not want to make the project they're from - they  make really interesting background designs and textures on your mixed-media work!  That's what I've used here:

STEP 6: Stamp general / abstract / background designs around the edges of the page using a similar shade of ink* to your background colours [*thanks to Kate Crane for that top tip!]
When you've stamped the design once - there's no need to ink up the stamp again - just keep pressing the stamp down until all the ink has gone. This way your stamped design moves across the page with subtle changes in the depth of colour throughout.

I used the Infocrea 'Abstract' stamp set above and again here, this time in a light yellowy-orange to compliment my existing shades of green and blue:
Can you see how there's a real depth of layering appearing now? This is when a background can really begin to come to life. When it stops feeling like an anonymous bare canvas and starts to look ... dare I say it ... like art!

However ... if you've gone a little too far with any of this layering at [for example here I stamped in a grey that came out drab and dark and I just didn't like it] then DO NOT DESPAIR!!

You can always ...

STEP 7: Assess areas of the page that would benefit from some white paint or Gesso to brighten them up / hide mistakes! 
Just use a glue spreader, scrap of plastic, sponge, paintbrush .... or finger .... until the background feels bright again. Now you're ready for a focal point ...

STEP 8: Browse through old books, magazines, junk mail, leaflets, catalogues etc for an interesting image
or better still create your own Frankenstein image from a combination of a few! This is absolutely one of my favourite favourite parts of the process!

Here the body of the fish came from an old children's' encyclopaedia and the mannequin head came from a promotional postcard for an opera that fell out of my weekend newspaper supplement ages ago [I'd been hoarding it safely ever since!]

Use gel medium again to fix it to the page.

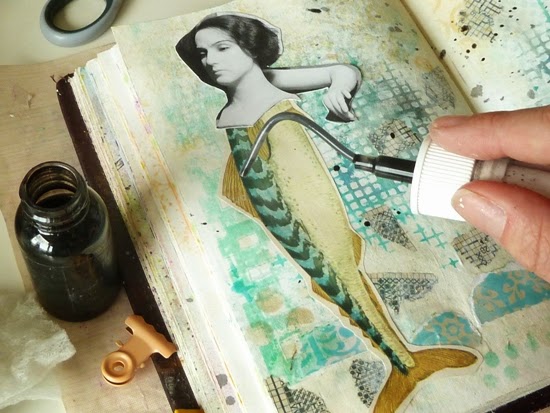
STEP 9: Unscrew the nozzle from a bottle of spray ink and tap it so little drops land on the page 
I've used a silvery black shade here to introduce a dark shade to balance the colour of my mannequin image. But, as the drops of ink are so small [and as I control how many I add] I know it wont 'dirty' my page as much as if I stamped another design with a black ink pad or something like that.

STEP 10: Sift through a variety of old book pages until a phrase or two finds you - then cut it out 
I'm a firm believer that the right words find you. You don't find them.

Take inspiration from the image you chose - let your mind wander to what it represents to you - or what it could represent if you let it ... and just skim read through your pages. Then inevitably something leaps out at you and just feels appropriate for that page.

Small confession: I selected the phrase below before I selected my focal image and instead browsed for images I felt could represent it. But whichever way around you do it image then wording / wording then image ... it's when they work together that your journal page will gain a cohesive narrative. Tell a clear story.
Oh and ... I absolutely love to combine phrases which have come from widely varying original sources.

The phrase above was a chapter title from a medical research book while the snippets below are taken from a 1960s novel for teenage girls and a kids' annual:
I'm currently working on a series of 'found' poems / short-short stories using this technique and - while it's a little scary to feel this way - I think I might have just landed upon my 'thing'. The technique that feels 'right'. The one I can see myself doing for a long time ... and it's exciting!

Anyway ...

...if you can't face cutting into a book yourself or you'd like some 'new blood' to add to your old paper collection then have a browse around the Plundered Pages section of my shop.

STEP 11: Assess if the page needs a final splash of colour. Like neon green. And if it does ... then splash it on! 
Using my old faithful Lost Coast Designs 'Zebra Stripe' border stamp I livened the page up a little as it was beginning to feel quite 'safe' and flat. But, as I didn't want to ruin the entire colour palette I'd created so far,  I again paid heed to that tip of using an ink pad in a similar shade. Albeit in neon this time round!

And I was much happier after that zesty colour boost!

As you can see I stamped over the image in places - just to help it settle down into the page so it didn't feel too free-floating.
Or free swimming.

Or however a half fish / half mannequin would sit on a page!
STEP 12: Add some 'journaling' ...  
Now for the big question people ask about art journal pages: do I really have to write on them?

To which I'm going to reply ...
  • Nope. It's entirely your call. You're a big girl/boy now [most likely bigger than me] so I'm not going to force you to do anything!
  • I hadn't intended to write on this page at all
  • I wasn't entirely sure where the feeling behind my snipped phrases had come from [like I say - it found me] and so I wasn't sure I had anything to add anything right at that moment however ...
  • I left it overnight and, when I came back to it the following morning I was reminded of a quotation that just seemed perfect for it. So I added that, by hand, around the outside edges:
And, to save you scrolling back up ... here's the end result once again so you can judge how those 12 steps mounted up to a finished page:
So, what do you think? 
  • Does art journaling feel do-able yet?
  • Has it helped you break down what a page can consist of?
  • Are you relieved to learn that white paint is the enemy of mistakes?
  • Do you see how there's no 'right' way to begin ... or to continue ... but that you just keep adding and tinkering and browsing?
I'd love to hear your feedback
  • so do leave a comment here with any thoughts, ideas or questions [I can't reply directly through my comments - but do try to answer people's queries in one way or another!]
  • or drop by my Facebook Page and
  • if you use Pinterest please consider pinning the tutorial so other people can find it too.
 
I'll look forward to hearing from you and seeing any pages you might make after reading through the steps again!
 
Julie :-)
 
---------------------------------------------------------
Supplies:
Supplies available from 3DJean [I'm a Design Team member for the 3DJean blog]
Other supplies:
Daler Rowney Gel Glaze Medium - Matt
Inkssentials Cut N Dry foam
Ranger Archival Ink - Viridian
Hero Arts Neon ink - Green
American Crafts 'Amy Tangerine - Ready, Set, Go' roller date stamp